home → TEMPLATES → Storyboard
Photography Storyboard Template
Photography storyboard template
If you’re a photographer with a need to organize your photo ideas before or after a shoot, consider using a photography storyboard template. While storyboards tend to be used most often for film narrative visualization, a photography storyboard can be helpful for projects like ad campaigns, commercial photoshoots, or unit still photography where gathering together a more structured visual narrative is beneficial. Or you can use a storyboard for photography before a shoot, gathering together reference images that display a color scheme and shot setup you’ll be aiming to recreate on shooting day. Either way, by using any photography storyboard templates, you can get a clearer, more objective sense of what you’re capturing in your photographs and why.
To explore and display all the broadest steps and benefits to creating your own photography storyboard template, we’ll be using StudioBinder’s storyboard creator. But since this is photography and tools like mood boards or shot lists can also align with these broad steps, you can use whatever works for you to follow along with us.
Step 1
1. Format your template
You’ll want to start by setting up your photography storyboard template in a way that accommodates you. Here, you’ll consider the sizing of your panels, the amount of description space under each panel, and the overall column structure. There’s no wrong or right way to set up your template, so build it based on the photography storyboard ideas you have in mind and how you imagine the layout will benefit your visual processing.
When you create a new project in StudioBinder, you’ll be guided through some basic template setup options that you can always readjust down the line. When your setup is finished, your photography storyboard will look something like this:
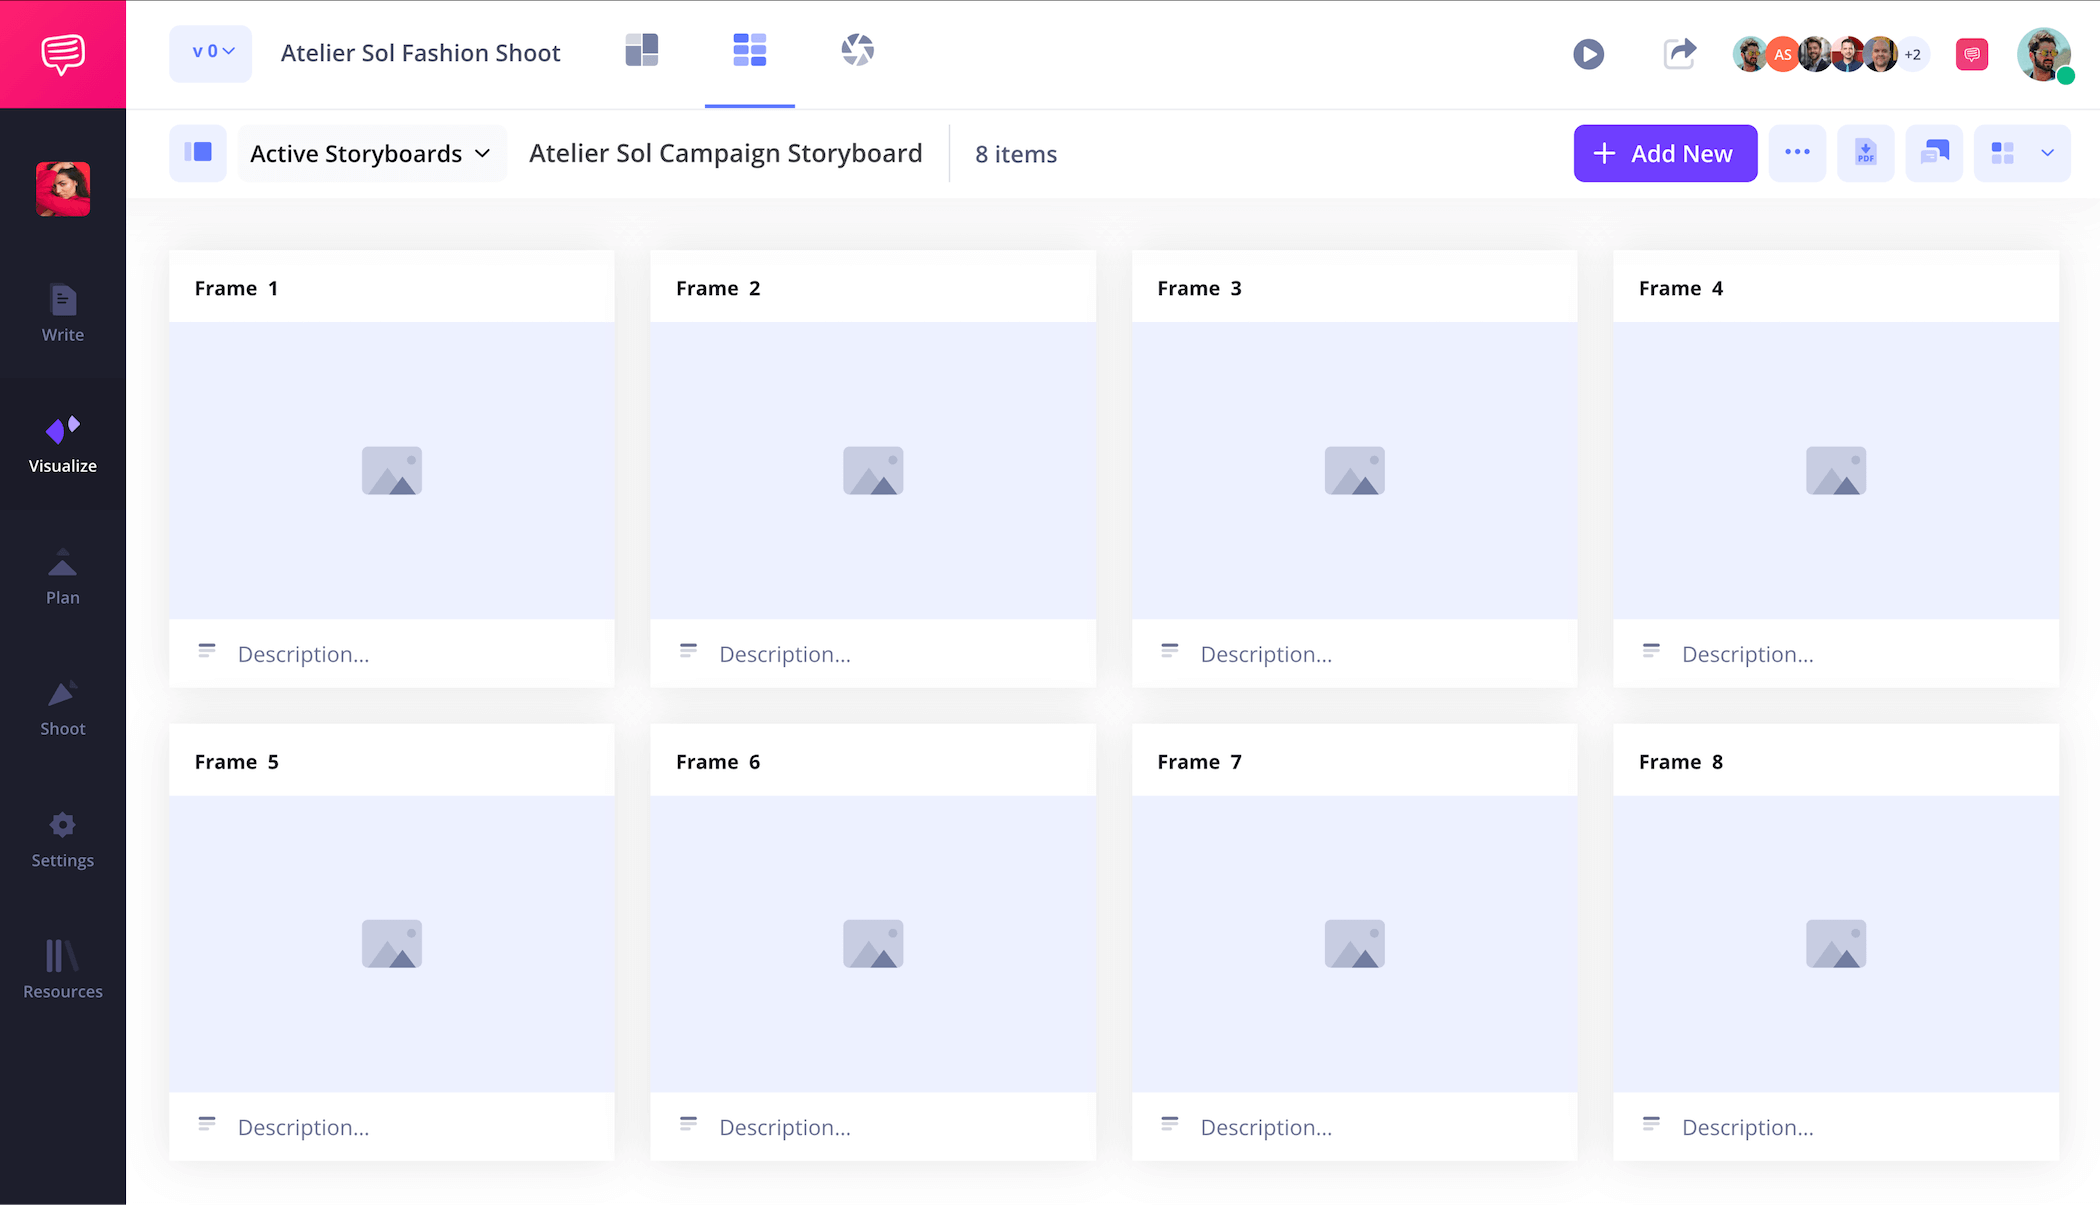
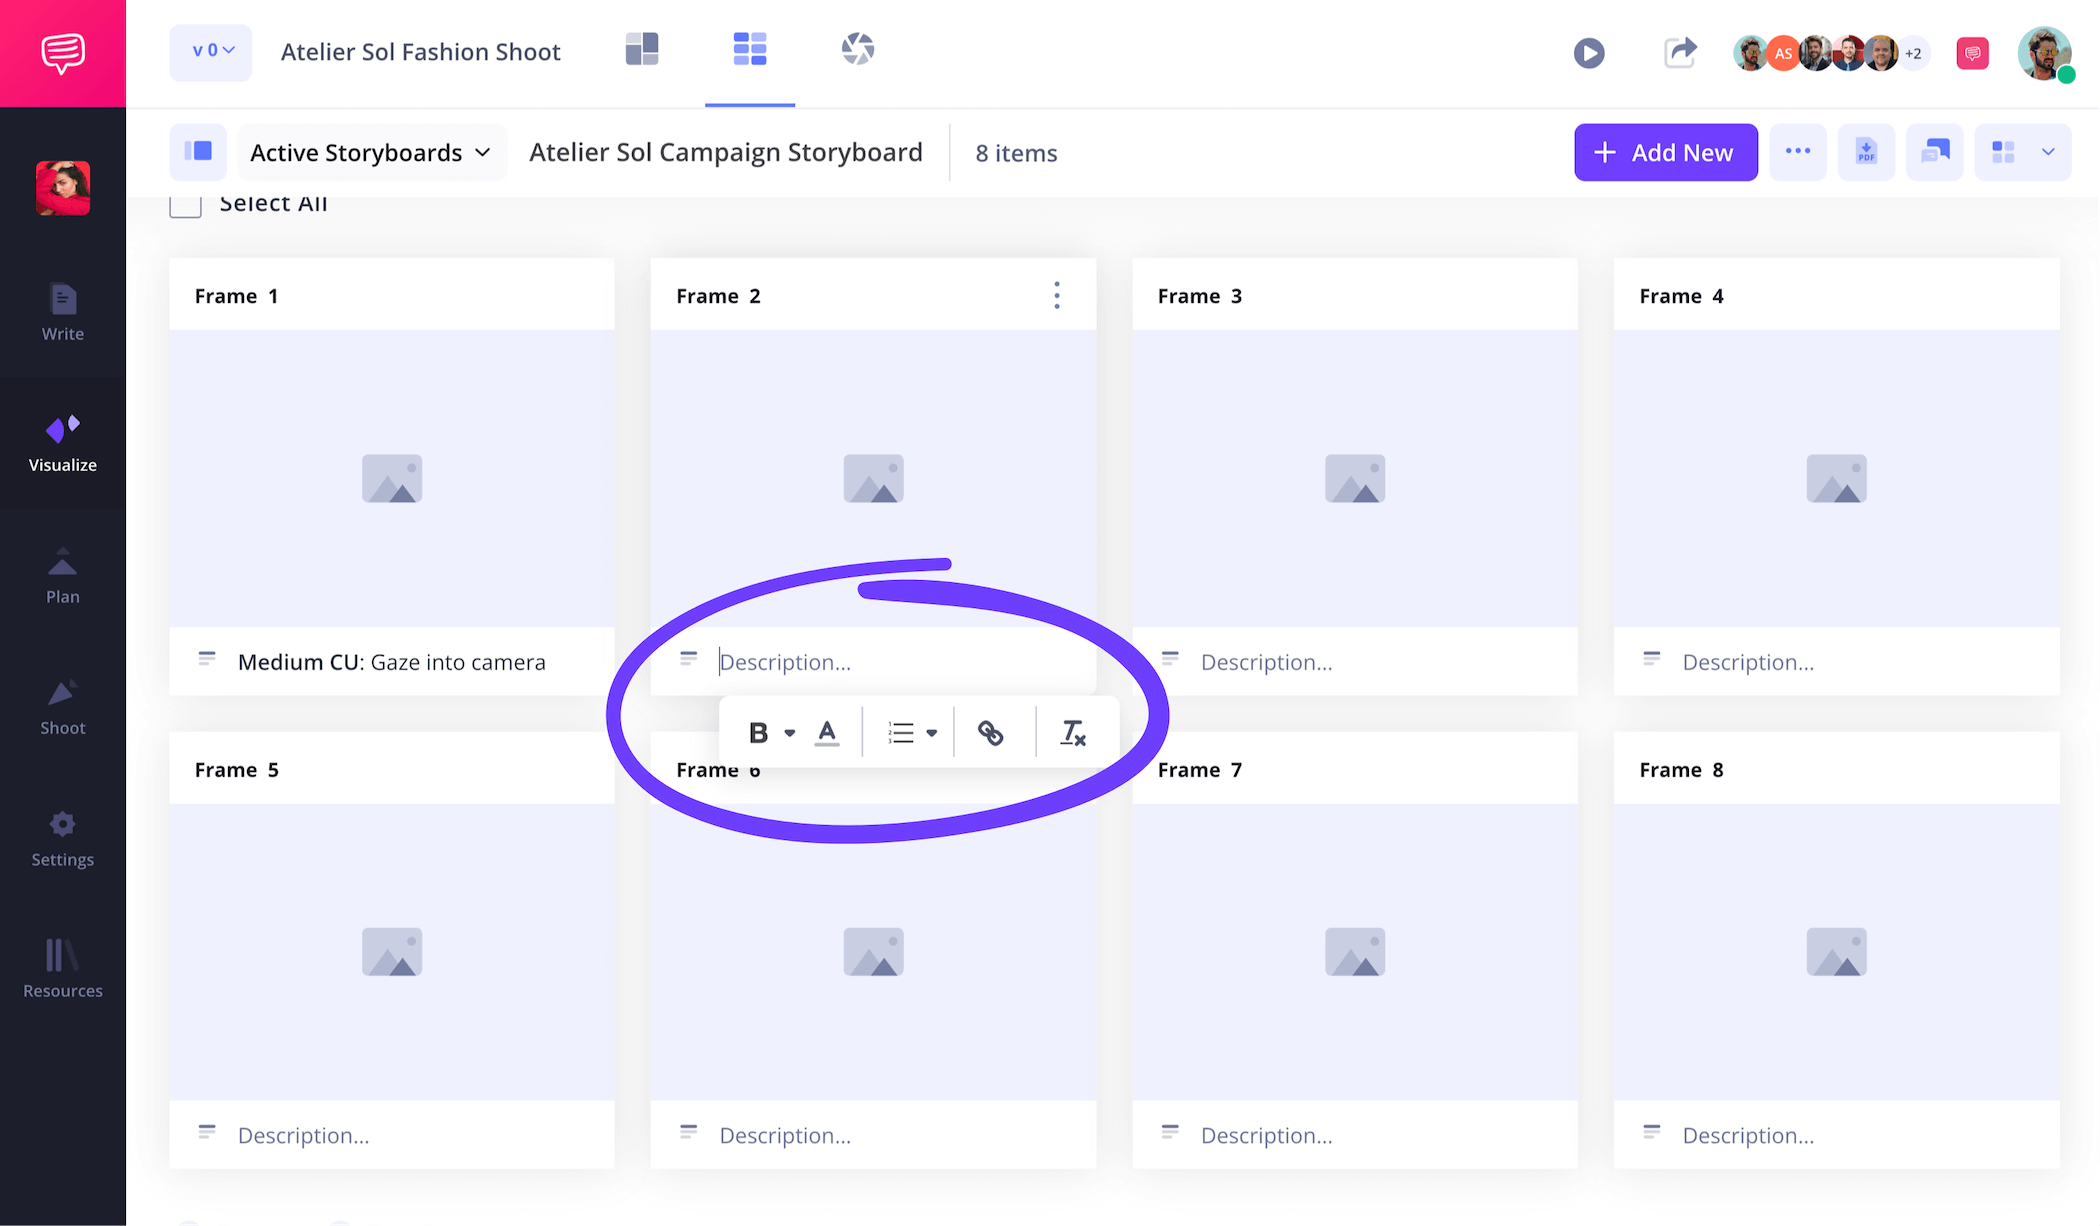
The description fields beneath each panel can be customized depending on the amount of description space you require. This is where you can detail information like lighting, wardrobe, backdrop, and camera focal length. Basically, if it’s relevant information for the shot, type it in.
Step 2
2. Upload images
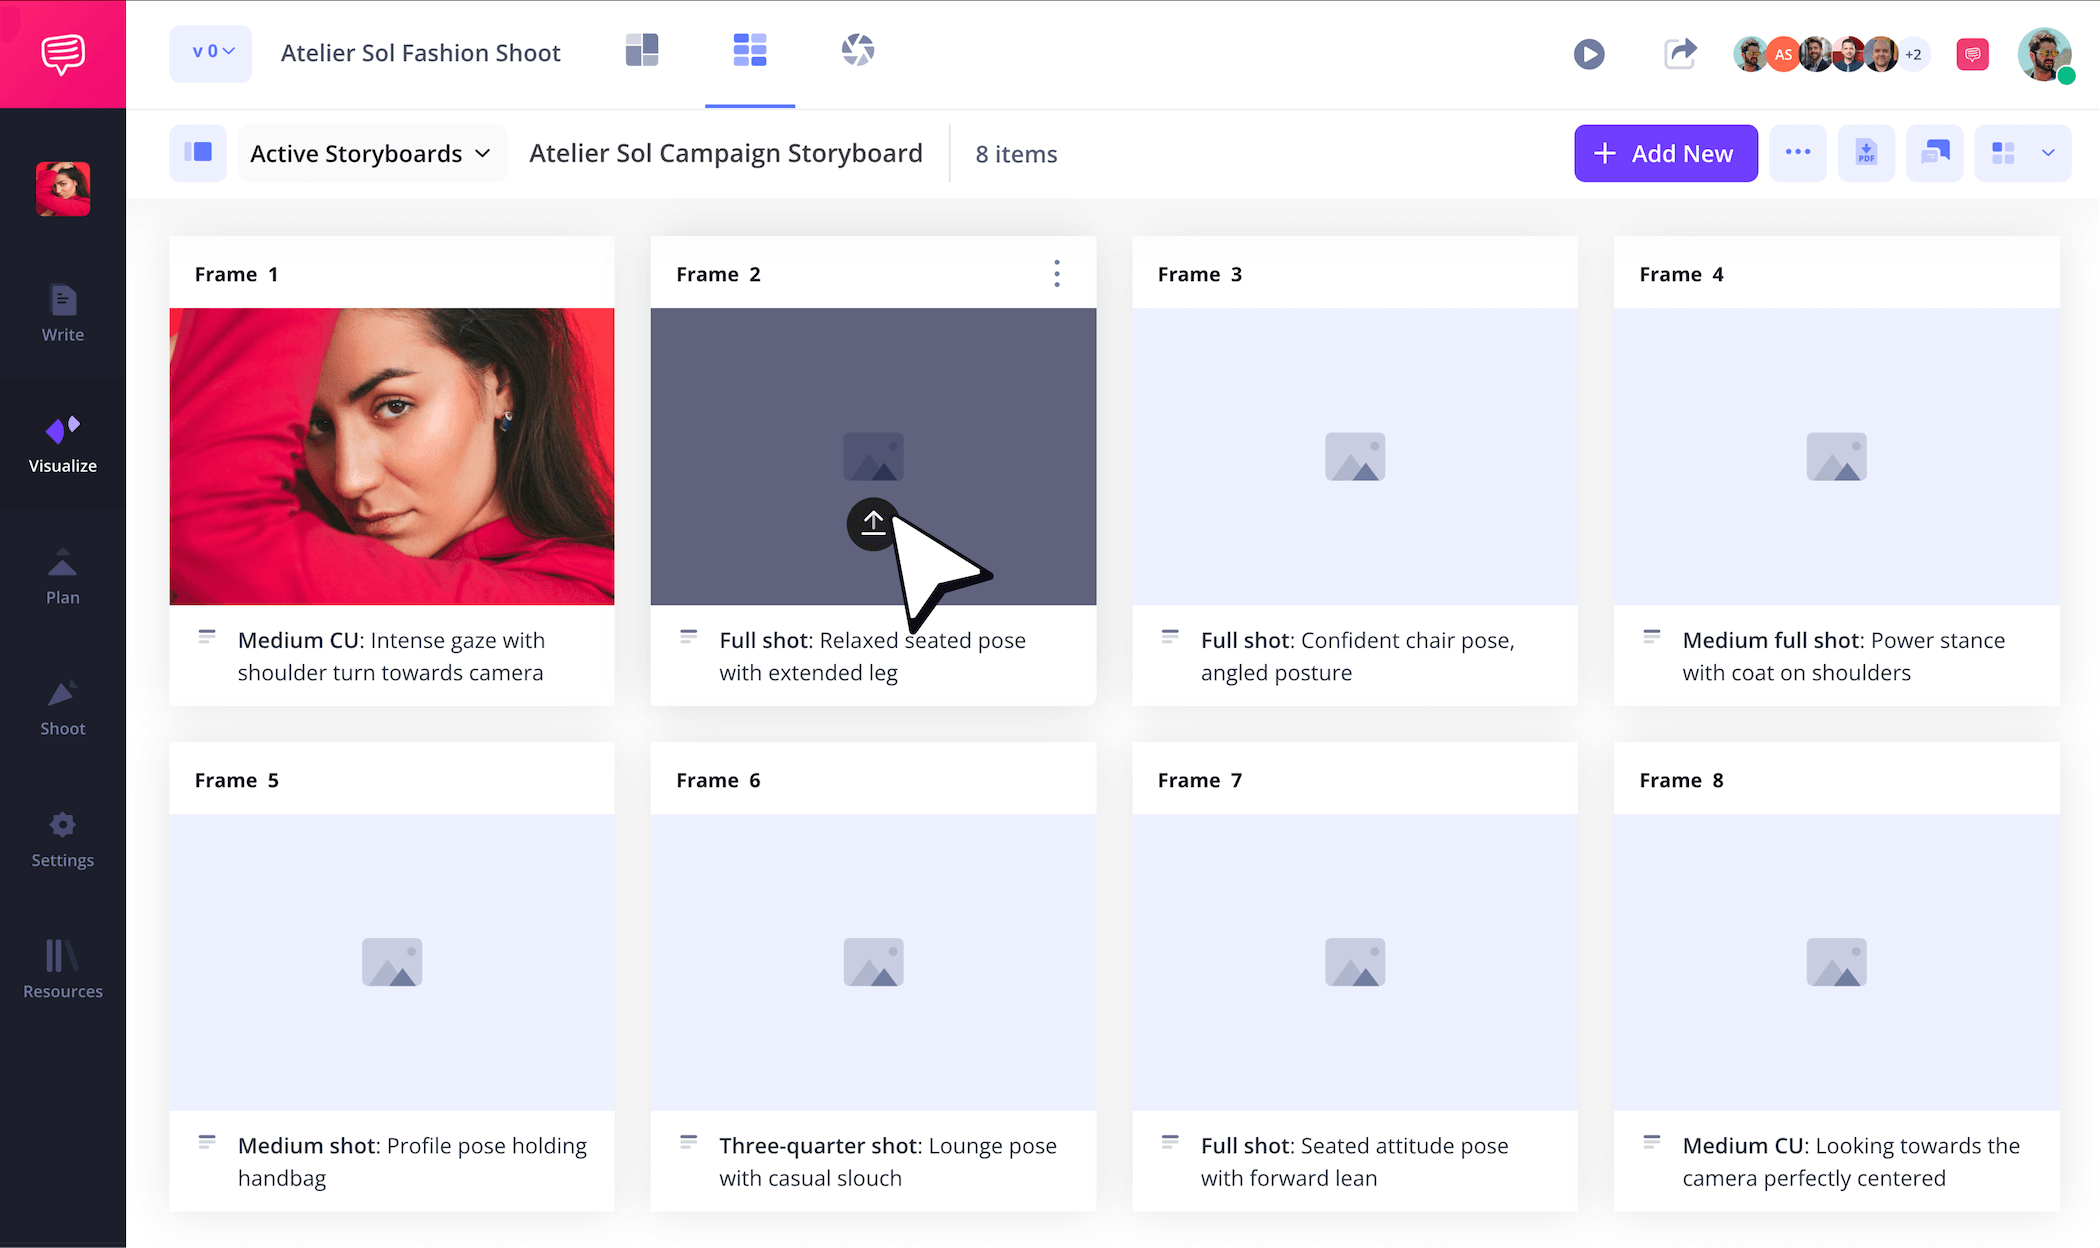
Whether you’re building a narrative photography storyboard or just laying out storyboard ideas for photography that will be captured down the line, images will be the basis of your photography storyboard template. It doesn’t matter if your photos have already been shot or if you’re planning to pull online reference images, this step is all about finding a visual flow and style that expresses what you or your client are going for. Once you have your photography storyboard ideas locked down, just click the upload button on any panel to add a new image.
Step 3
3. Customize images
As you build your photography storyboard, you may come across images that could use some slight readjustments. Maybe your creative director reaches out and says they think the color contrast of a particular image is just a few degrees away from getting the overall tone of the photo just right. For corrections such as this, you can use StudioBinder’s built-in image editor to finetune, add a filter, or even include text to clarify shot intent.
For the photography storyboard examples we’re working with, we added just a bit more saturation to our photo in order to brighten up our color tone that was just a bit duller than we intended.
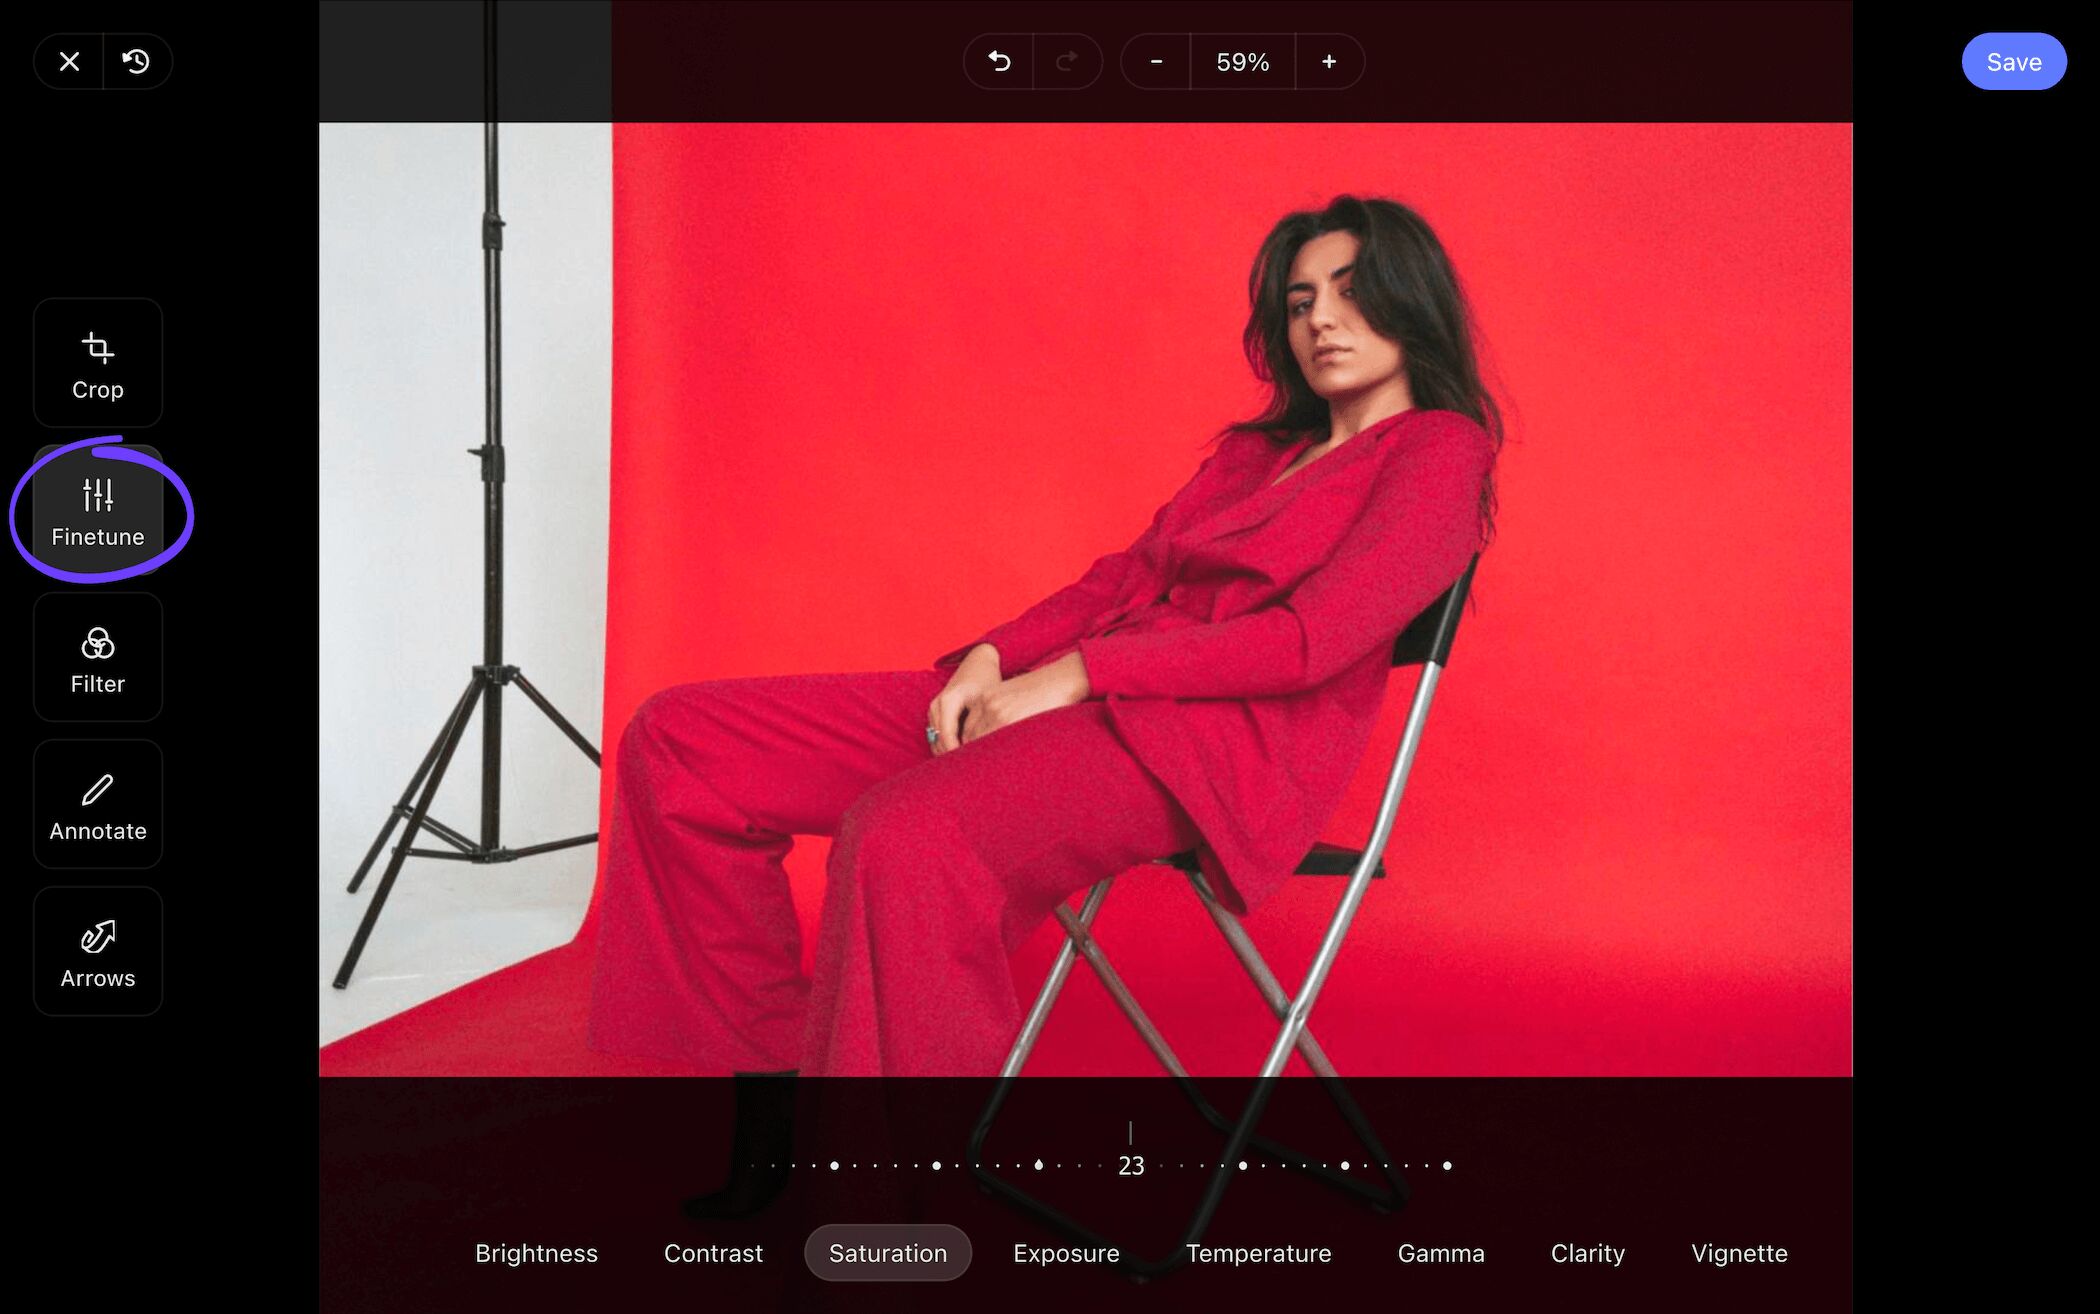
Once we were happy with the increased saturation and our creative director echoed our sentiments, all we had to do was click the save button and our readjusted image was added into our storyboard for photography.
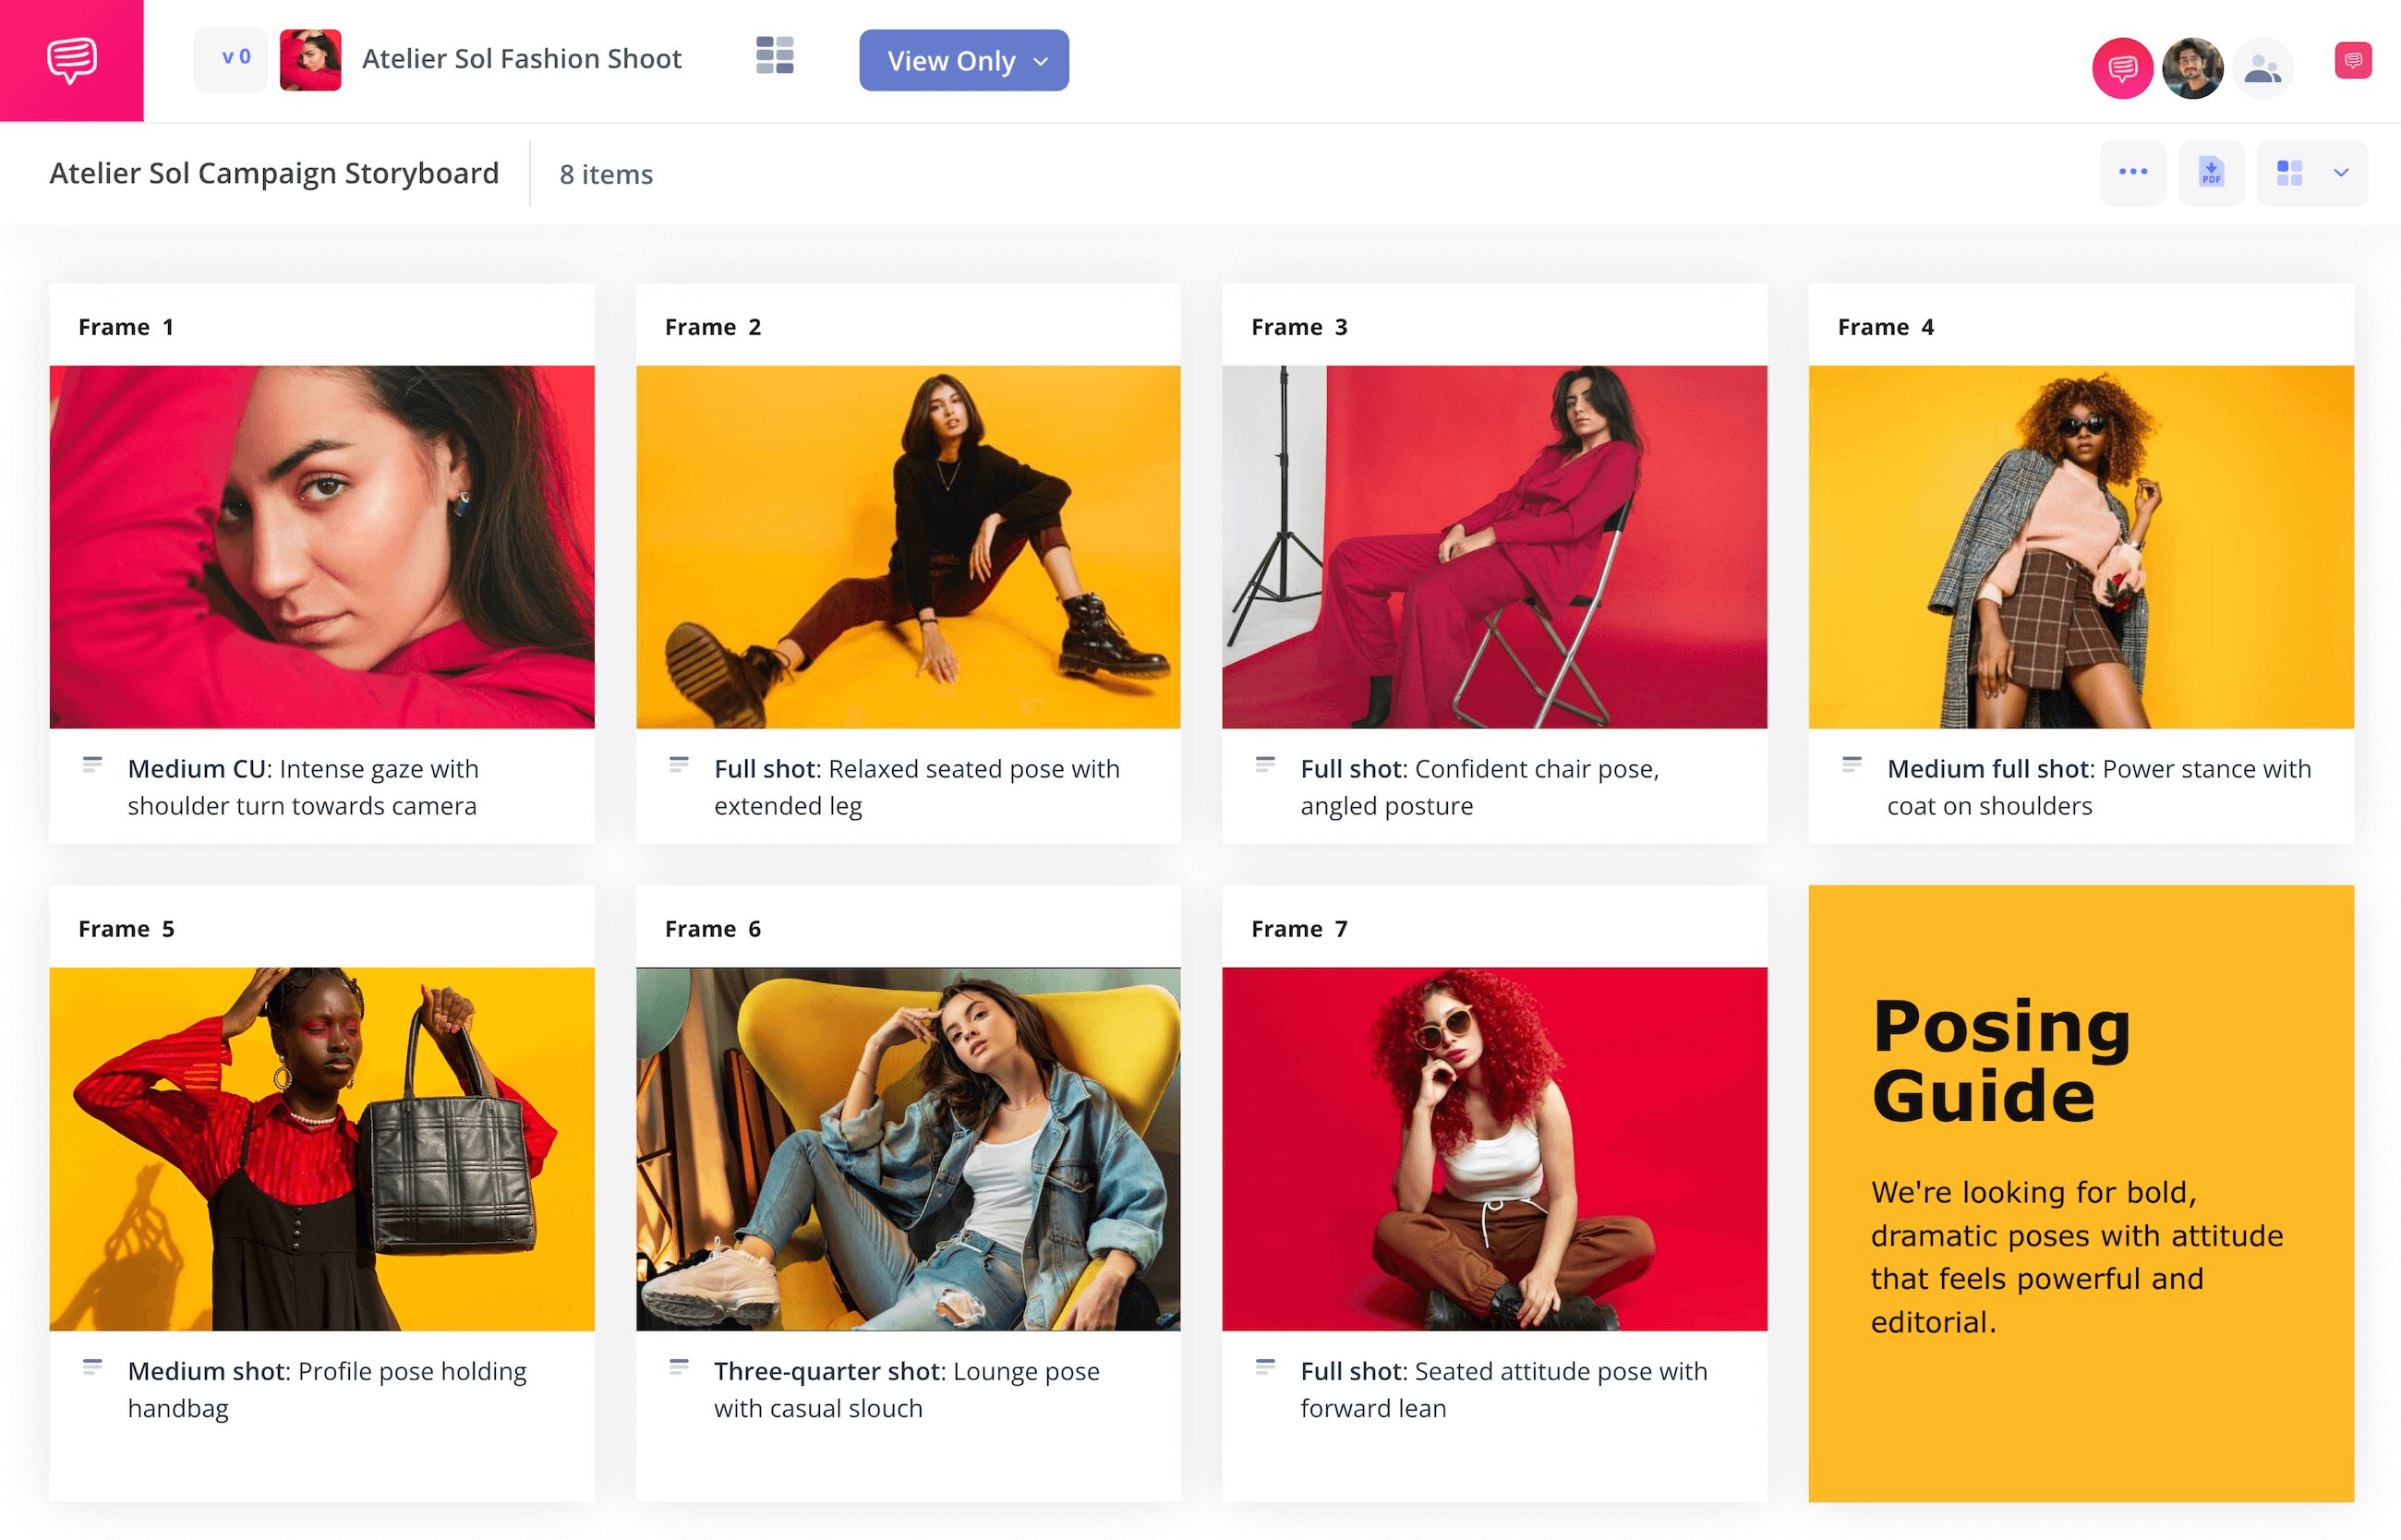
While we're at it, let's add a Text Box for more context on the posing details for the fashion photoshoot, then click Save.
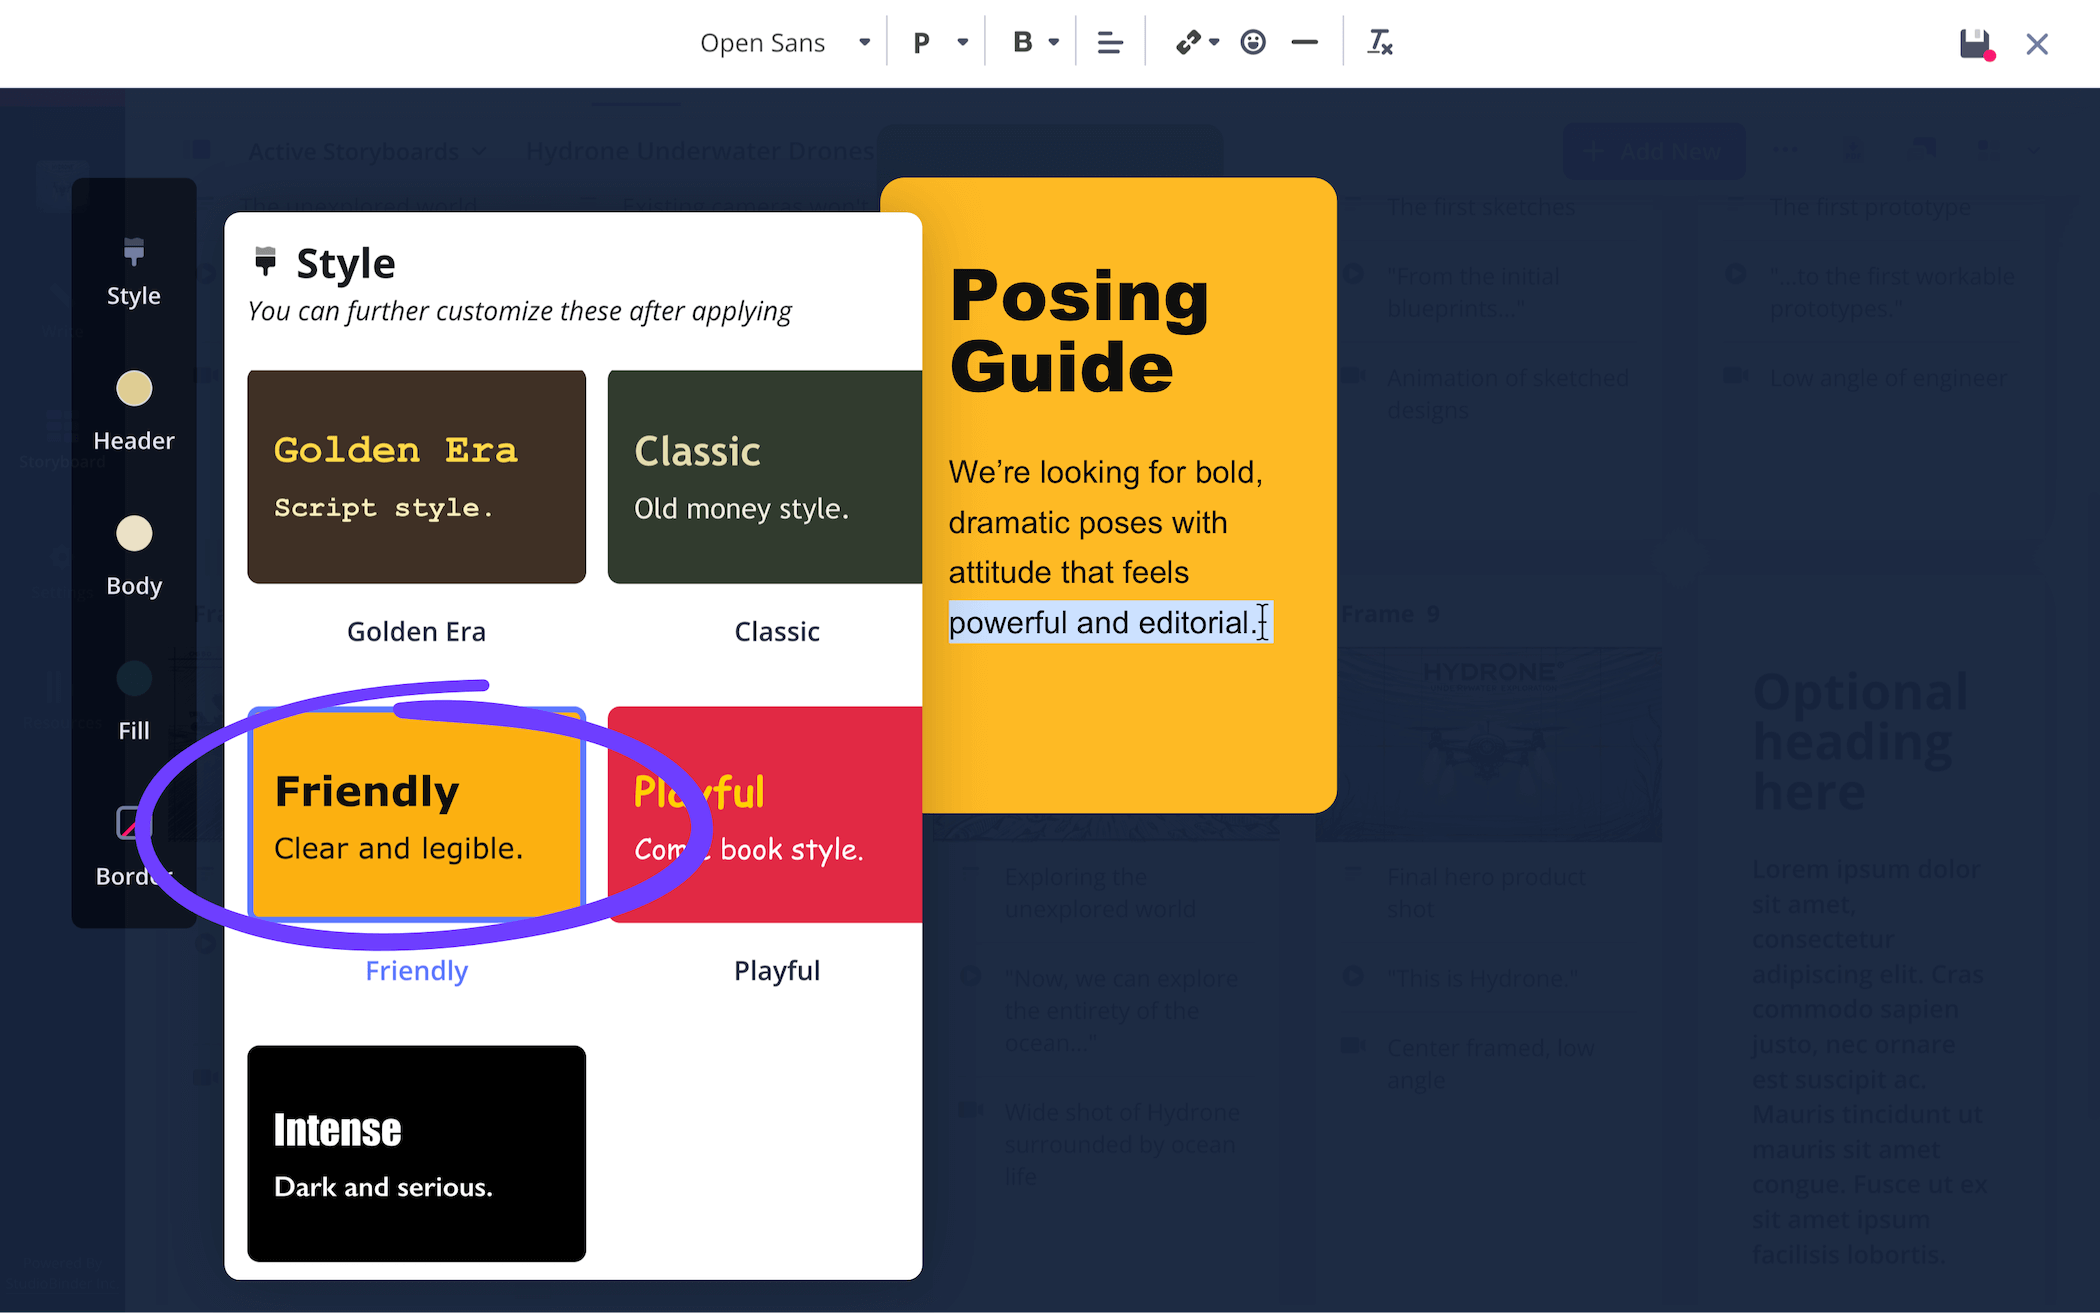
Your storyboard should look something like this now with the updated image adjustments and the new text box:
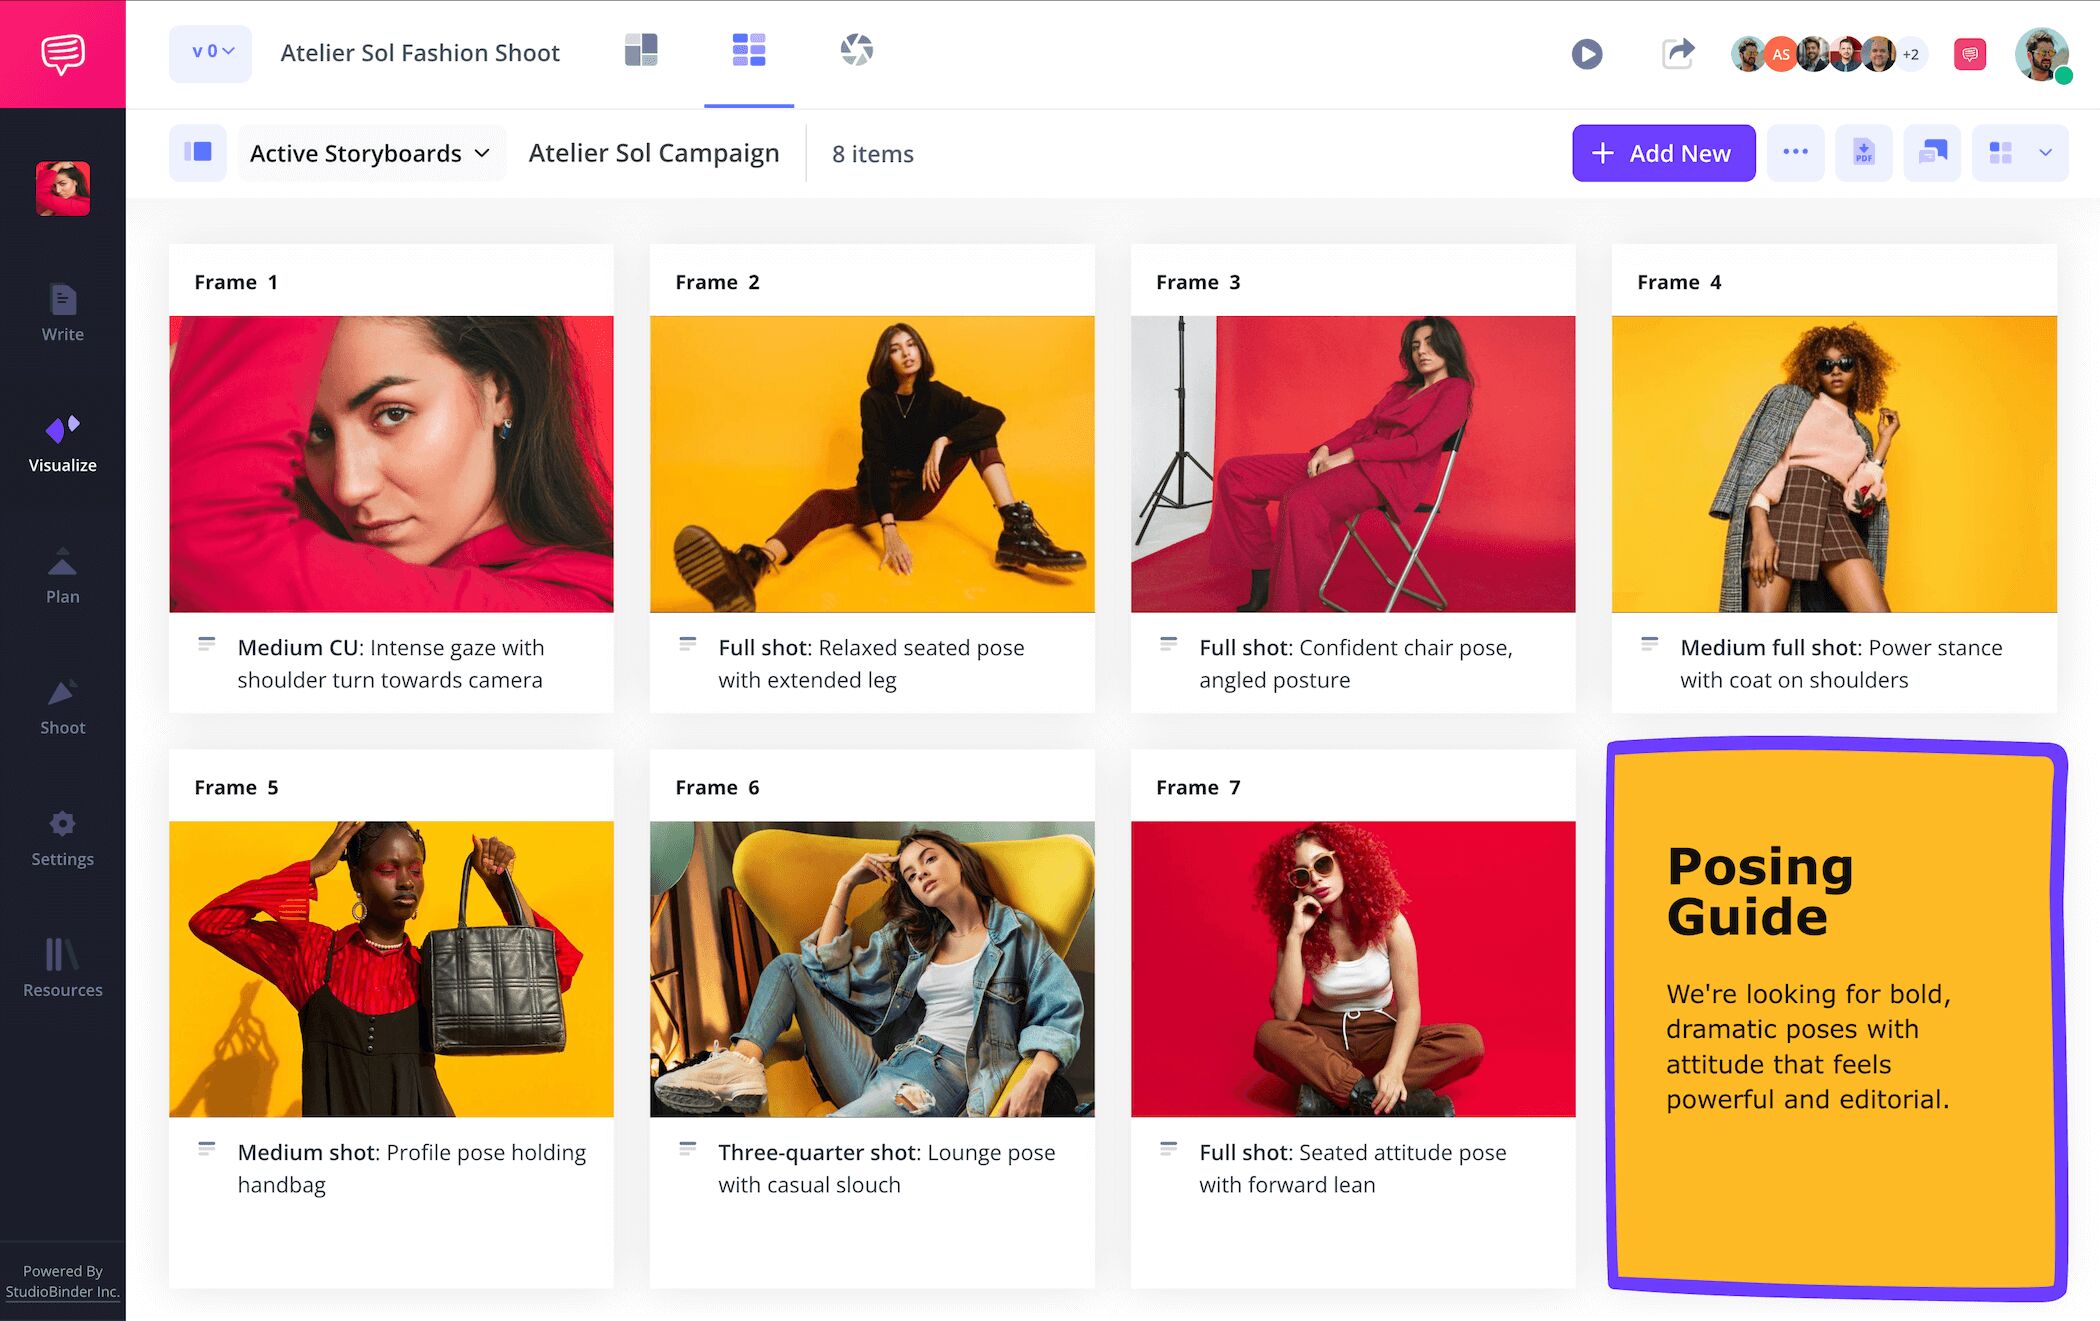
Step 4
4. Collaborate and share
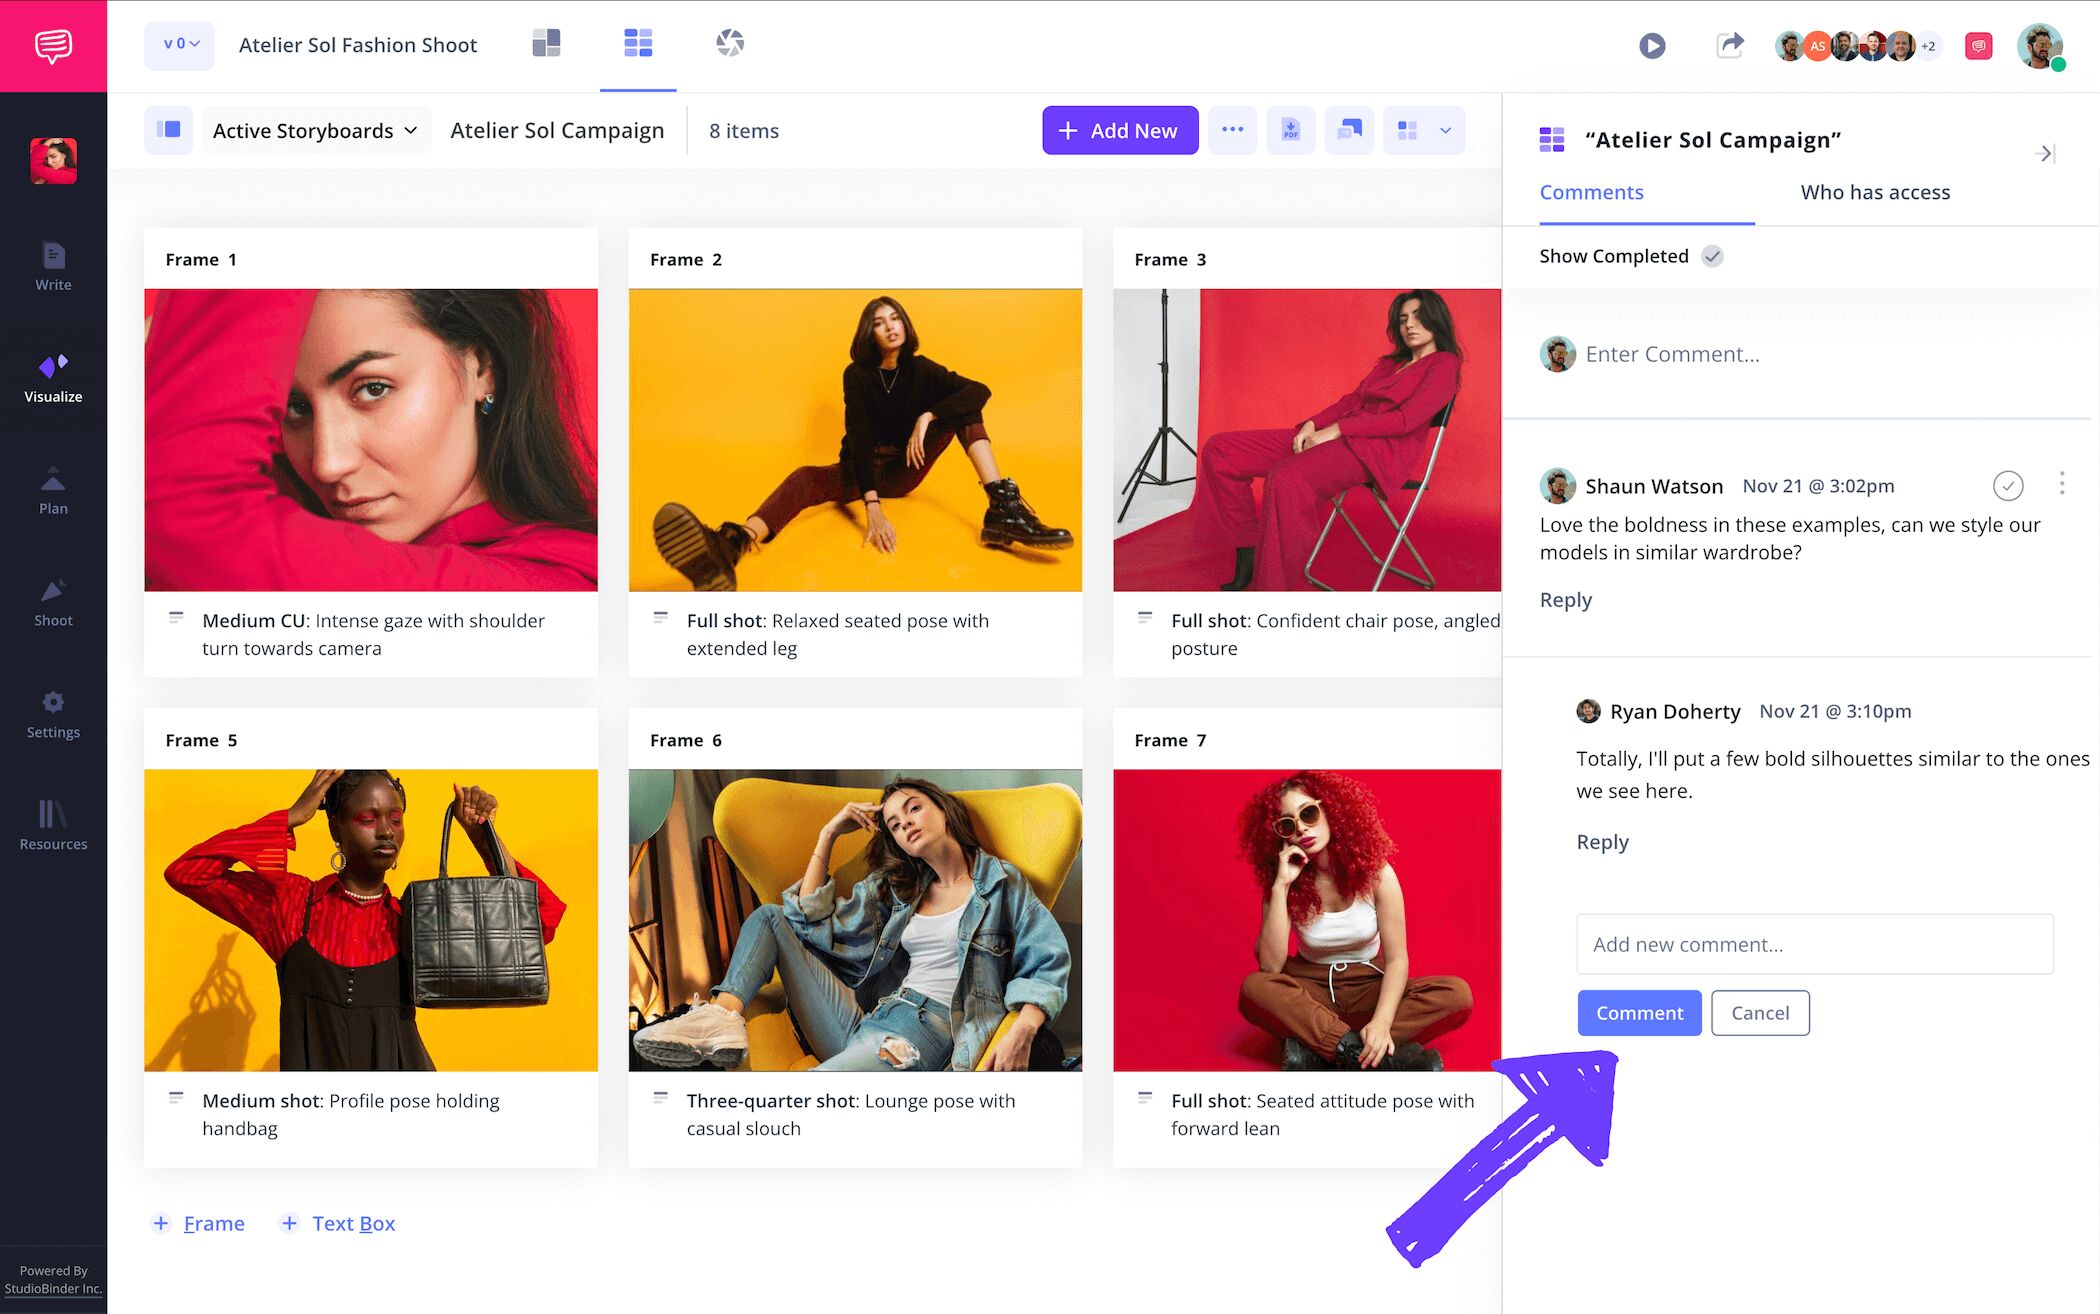
Collaboration is key when making your photography storyboard template the best it can be. Let’s say you’re working on a high concept fashion spread for a client and you want them to be able to keep an eye on your photography storyboard every step of the way. They’re every bit as important to the vision you’re bringing to life, so you want to make it easy for them to make edits and leave feedback on your narrative photography storyboard. Even if you’re working solo on your storyboard, getting a fresh pair of eyes on your project can be a great benefit.
For all these situations and more, StudioBinder acts as an all-in-one hub for all your collaboration needs. Send over a view-only-link to anyone who wants to look over but not modify your photography storyboard ideas. But for those who want to leave some feedback or edits to your project, you can select between commenter or editor when setting their invite permissions.
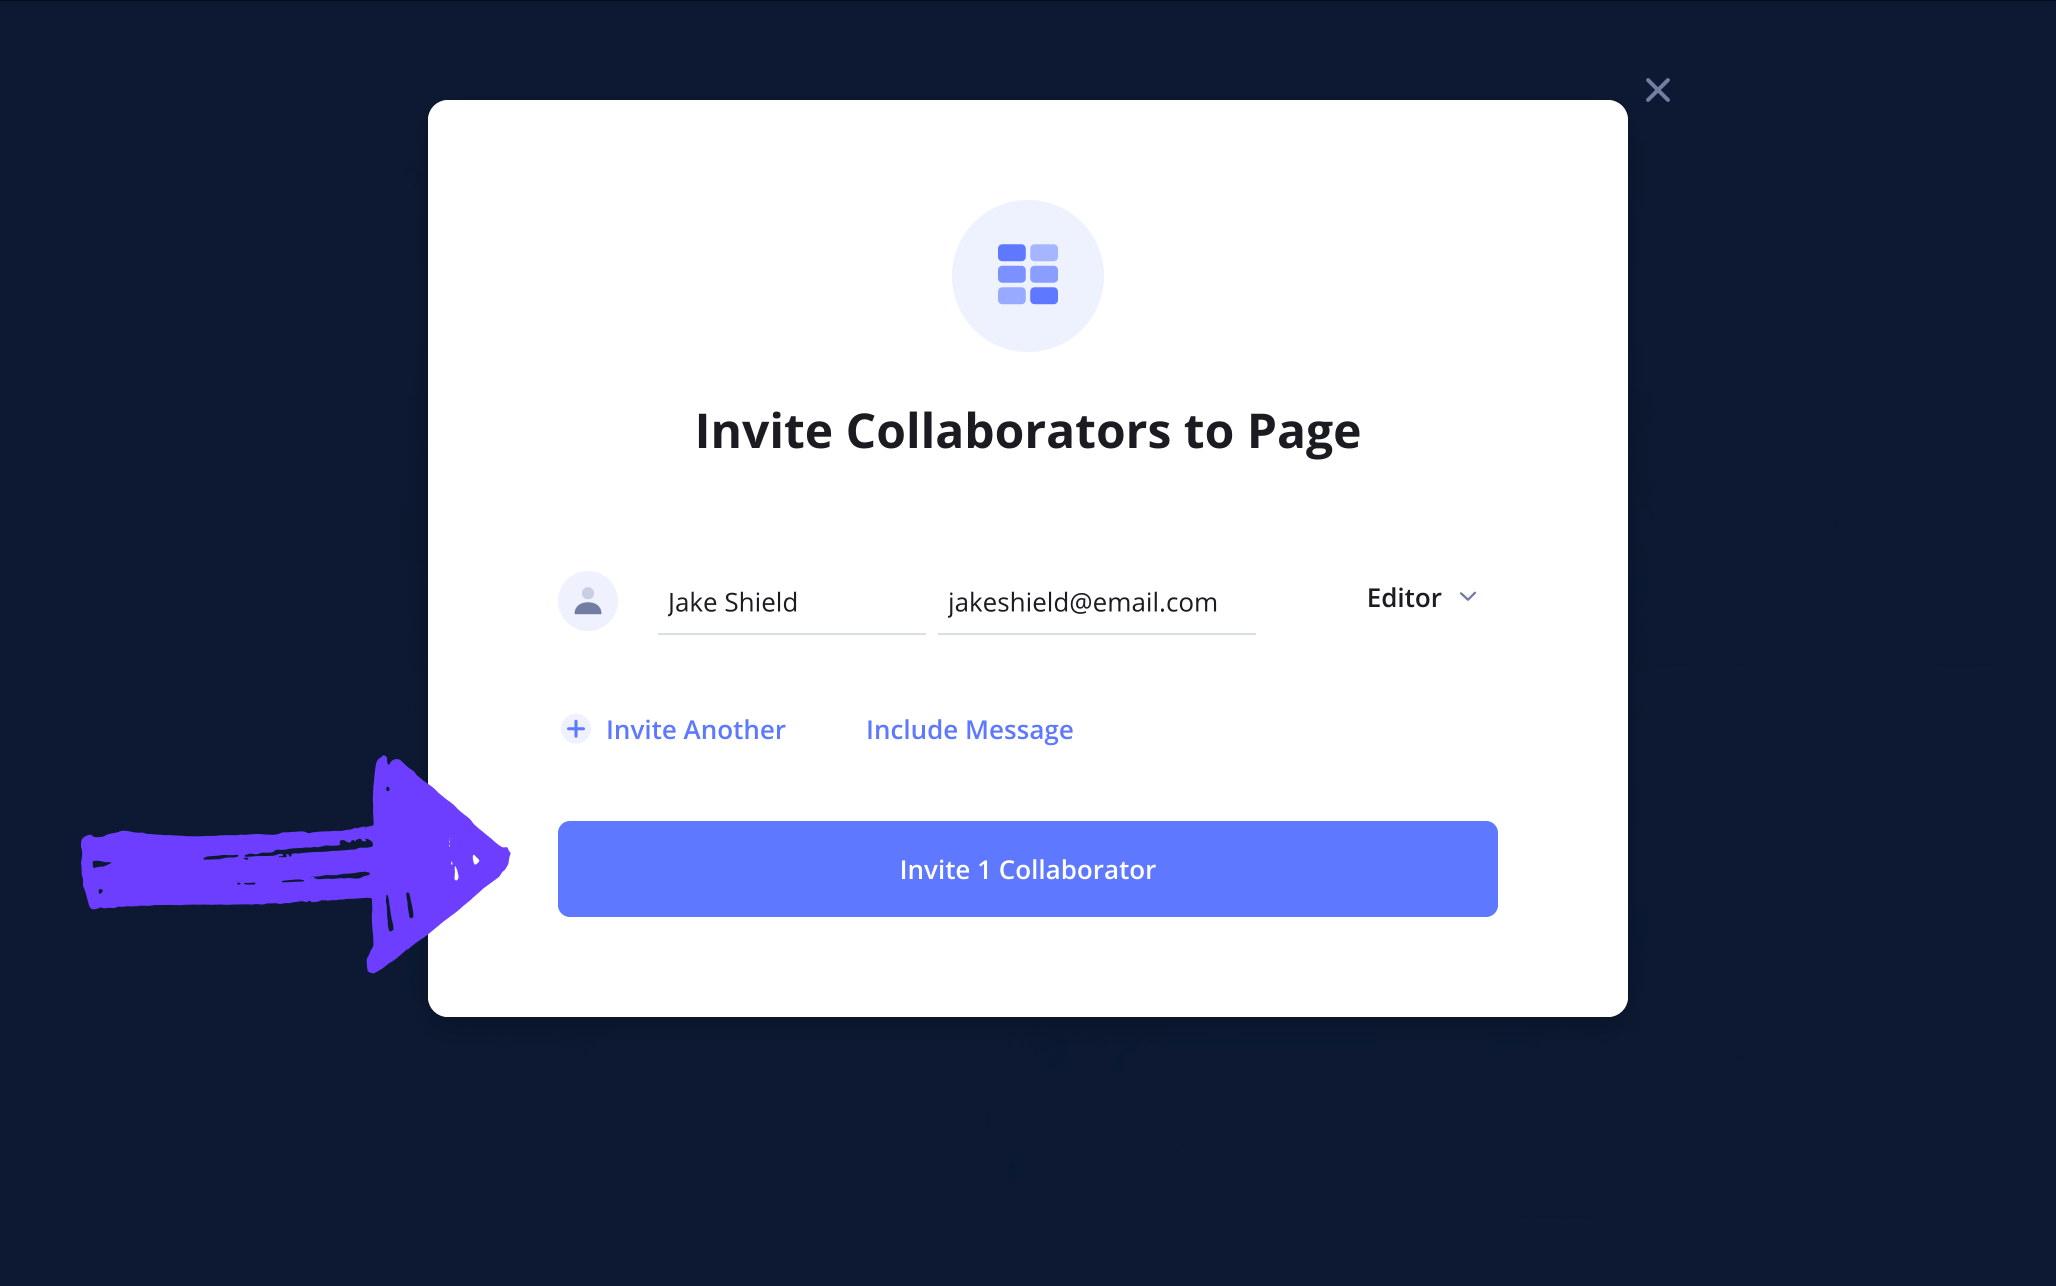
With a commenter or editor invite sent, your collaborator can take to the comments section of your photography storyboard and type out whatever feedback or notes they have for you. Then you can send a reply to kick off a productive conversation.
Step 5
5. Download a storyboard PDF
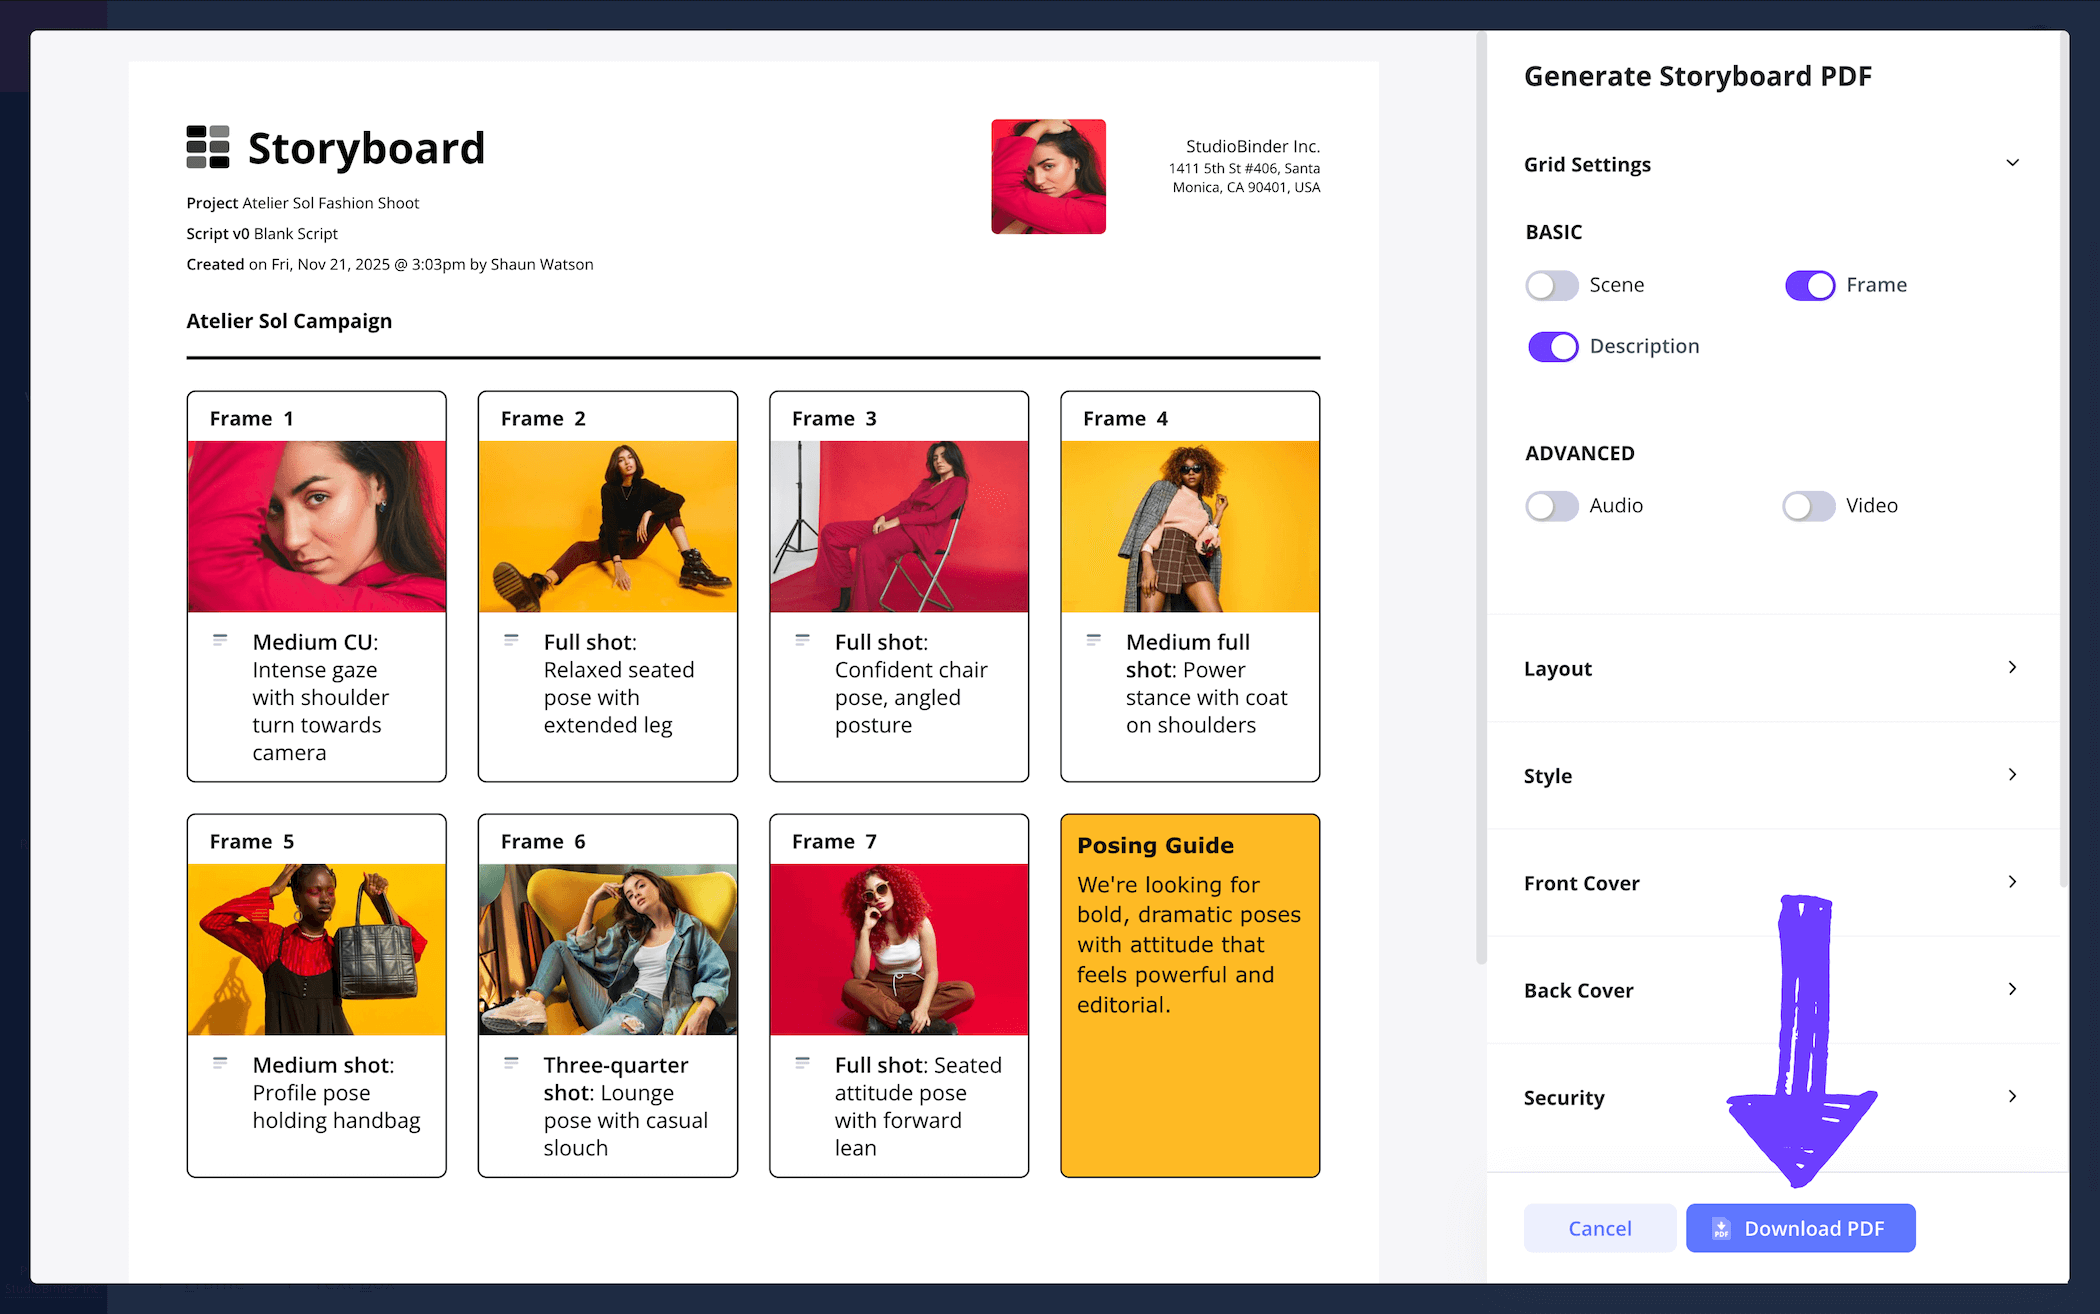
Now that you’re closing in on finishing your photography storyboard template, you’ll want an easy and efficient way to send your finished project to clients or team members. But as you know, anyone working in or with the photography industry tends to have a keen eye for detail, so you’ll want to have some customization options available depending on who you’re sending your PDF storyboard document to.
When you get to the generate PDF page of your storyboard for photography, you’ll notice plenty of formatting options you can tinker with. If color scheme is an important factor in your photos, be sure to keep print color enabled. Just as well, you can change your storyboard’s font color and size to keep your work designer specific.
For our own photography storyboard example, we added a watermark in the security section because you can never be too careful when it comes to sending your work to the right person.
Conclusion
You're done!
Whether you’re shooting for the next Vogue fashion cover featuring the most renowned fashion models of the photography industry, or you simply want to plan out a style and mood that speaks to your unique photography skills, a photography storyboard template is all you need! And in case you have any other visual narrative ideas you want to start planning out, take a look at all the free storyboard templates StudioBinder has to offer.
Frequently Asked Questions
Your questions, answered
Making a storyboard for photography is easy and mostly relies on your own personal preferences. If you’re using a storyboard before you start photographing, you’ll find a pre-made blank storyboard template online and start filling all the blank panels with online reference images that match the look and style you’re aiming for. Write out all your shot specifics and any other important information in the description fields below each panel. If you’re using a storyboard after a photoshoot, you can lay out your photos on each blank panel in a way that signals to a narrative or style you intend to capture.
A photography storyboard isn’t exactly an industry standard, but it can be used similarly to a mood board or a shot list. If there’s a visual narrative flow you’re trying to capture with your collection of photos, a storyboard can be helpful with arranging all your photos in a manner that showcases a narrative you’ll get a better, more organized perspective on. Just as well, a photography storyboard can be used before a shoot, essentially bringing together a collection of internet template images that showcase the kind of visual tone and style you’re hoping to capture.
It’s far from an industry standard to use storyboards as a photographer, but it’s also not unheard of. When it comes to more structured, narrative featured photoshoots, like ones you might find in a fashion magazine or advertising campaign, a storyboard can help give a visual taste before finalizing and publishing. However, for any kind of artistic or personal photography, storyboards are not a common practice.
While using a photography storyboard template is far from a requirement when planning or gathering together all your photographs, it can be helpful in some cases. If any of the below reasons speak to you, then you should consider adding a photography storyboard in your photography toolbox:
- Filling out shot descriptions can oftentimes be like brainstorming, reminding you what is missing in a shot.
- With the previsualization a storyboard provides, you’ll think more logistically about things like camera setup and model poses.
- If you intend to find any kind of narrative structure with your photos, a storyboard can be the perfect tool for arranging and sequencing.
- If you’re working with any brand clients, a storyboard is a good way to convey your vision before and after a shoot.
- If you’re prone to anxiety during a shoot, a pre-planned storyboard will give you confidence in what you need to accomplish, like having a study guide to walk you through the process.
