Are you asking yourself, how do I slow down a video? There are many reasons why one might want to slow down footage, but how is it done? The process is different depending on the particular editing program being used. In this post, we’ll be walking you through the four simple steps necessary to slow down video speed in Premiere Pro and we’ll provide tips for how to achieve the best results along the way. Let’s jump right into the first step and learn how to slow down clips.
How to change the speed of a video
Step 1: Plan in advance
While it is possible to bring any footage into Premiere and slow it down, you will achieve the best results if you plan your shoot accordingly. Slowing down footage means spacing out the frames. Therefore, if your footage was shot at a standard 24 or 29.97 frame rate, then your slowed-down clip can wind up looking jittery or choppy. You'll also lose resolution.
Here's our ultimate guide to frame rates to give you a crash course.
Ultimate guide to frame rates • Subscribe on YouTube
The key to shooting great slow-motion footage is to shoot at a higher frame rate than your intended playback rate. The higher your frame rate when shooting, the more you will be able to slow down your footage in post without it looking chopping. Specialized slow-motion cameras are ideal for this.
Deciding which moments to enhance with slow motion in advance can help you to visualize your scene with extra clarity. And, if you take the time during pre-pro to designate which individual shots will be put in slow-motion on your shot list, everyone on the crew can adjust accordingly.
It’s free to get started with StudioBinder’s shot listing software. You can even write slow motion into a script if you plan far enough in advance.
Camera rigs explained • Subscribe on YouTube
One additional factor to pay attention to if you really want to go the extra mile is stability. Slowing down footage can make small movements and adjustments to the camera body extra noticeable, and those movements can quickly become a distraction, especially if shooting handheld. To counteract this type of instability, instead of shooting handheld, use a tripod or one of the camera rigs mentioned in the above video. If you are looking for new gear, check out our tripod buying guide and our rundown of the best stabilizers.
How do you slow down a video?
Step 2: Import the footage
Whether you followed Step 1 when initially shooting your footage or not, the rest of the steps will be the same, though the end result may differ. If you are new to using Premiere Pro, this quick start video will help you get the lay of the land, including how to import your footage.
How to slow down a video in Premiere Pro • Starter guide
Bring the footage you want to slow down into Premiere by clicking “File” → “Import,” or by pressing the Command+I keys (swap Command for Control if editing on PC). You can also simply drag your footage into Premiere from a separate window. Once your footage is loaded into the program, you’re ready to slow down video.
How to slow down a video Premiere Pro
Step 3: Isolate the moment
Now, it’s time to isolate the moment you want to slow down. If you want the entire clip slowed down, simply drag it into the timeline. Alternatively, you can press “,” or “.” with your clip selected.
If you only want a portion of the clip to be slowed down, there are a few ways to isolate the moment. The most efficient method would be to set in and out points on the clip while it is loaded into the preview window using the “i” and “o” keys. You can use the onscreen player controls to set the in and out points instead of the hotkeys if you prefer.
How to edit and slow down a video • Set in and out points
Once your in and out points are set, you can bring the clip into the timeline using any of the previously described methods. Now that your moment is isolated, you are ready to slow it down.
How to slow down a video on Premiere Pro
Step 4: Slow down video
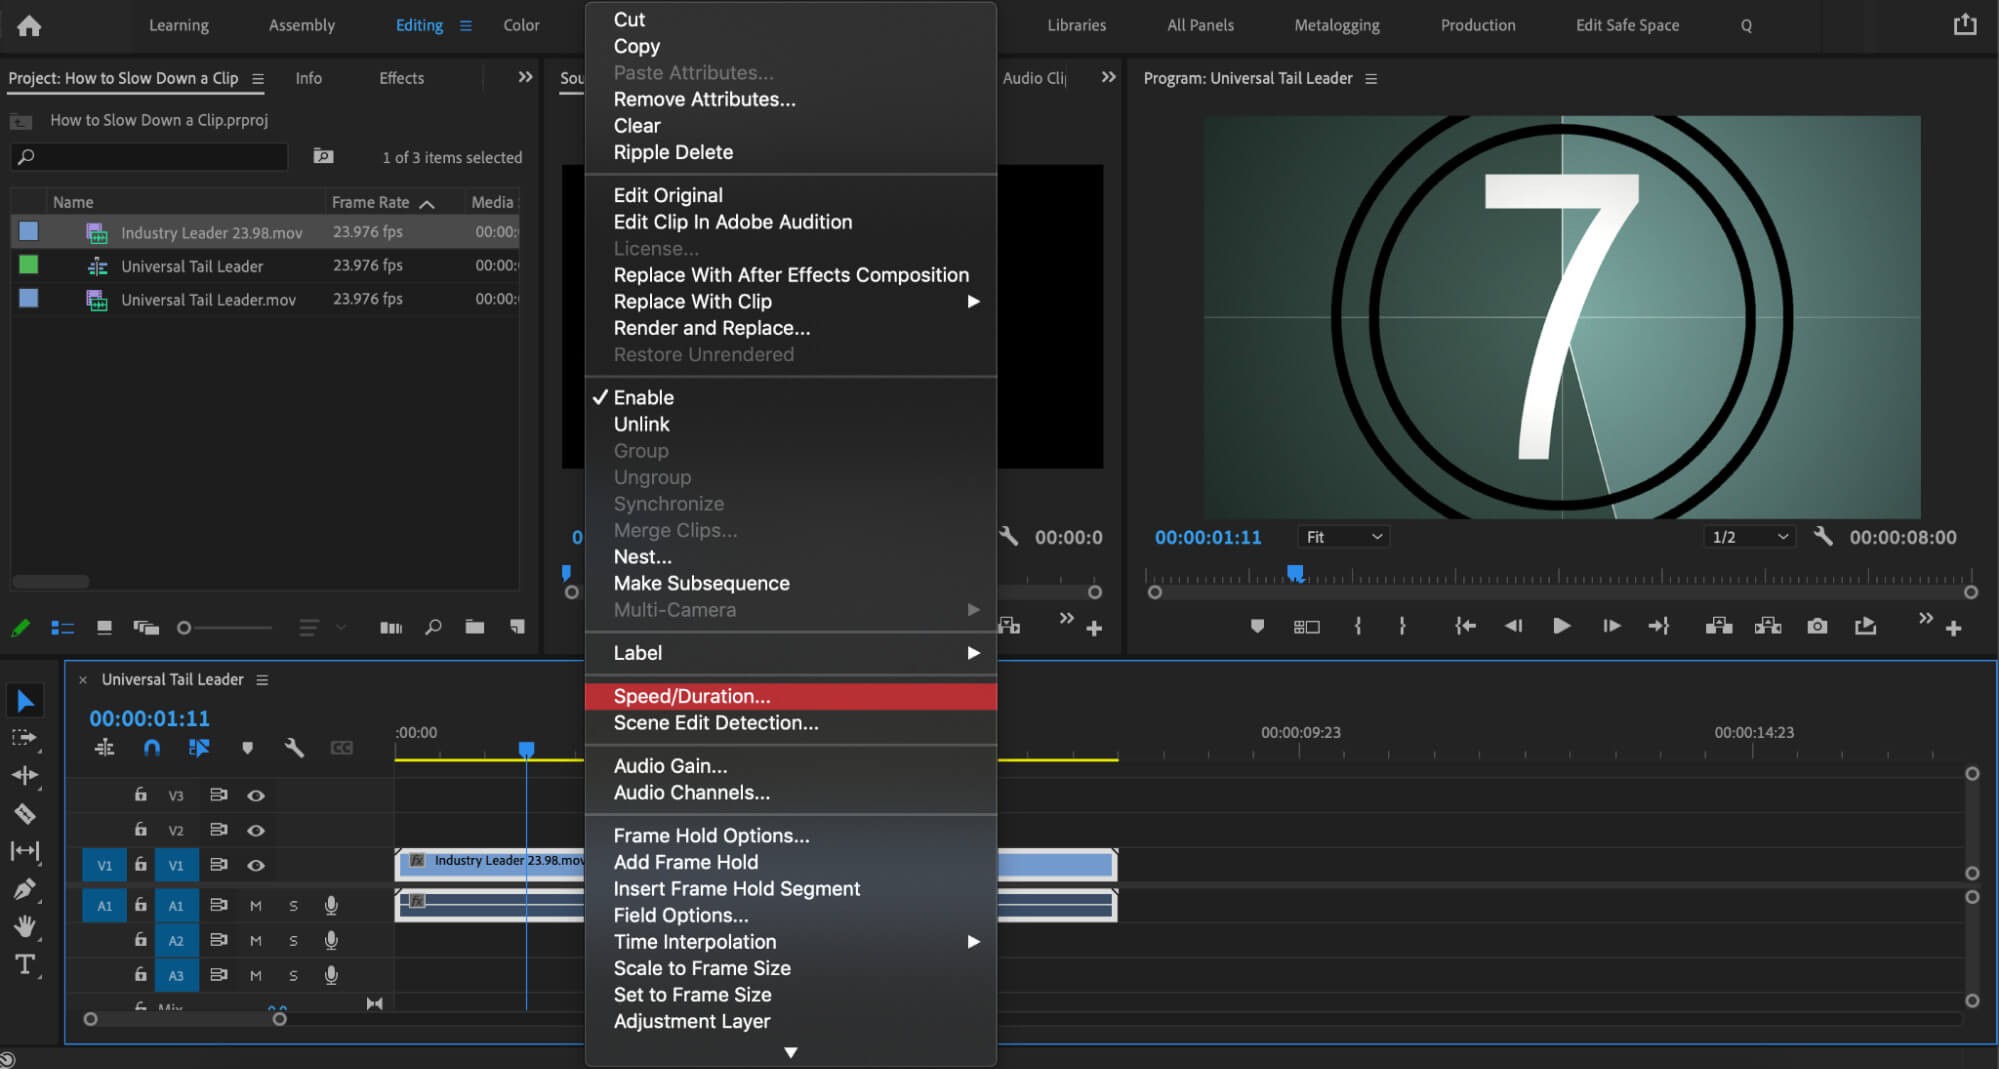
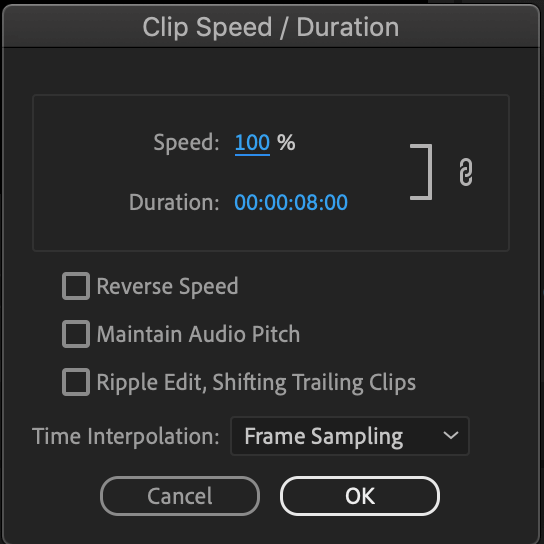
Premiere Pro makes slowing down footage easy. With your footage in the timeline, simply right-click on it and select “Speed/Duration.” A window will open with a few new controls. Since the goal is to slow down the footage, you will want to lower the percentage beside “Speed.” The lower the percentage, the slower the resulting clip will be.

Right-click → Speed/Duration
If you ever need to speed footage up, you can do so by increasing the percentage past 100%. If you don’t find percentages intuitive, you can adjust the duration instead. Inputting a longer time than the default will slow down the footage.

Speed/Duration controls
By deselecting the link icon, you can alter the speed and duration independently. You will also find three checkboxes in this dialogue window.
“Reverse Speed” does exactly as the name implies and reverses the footage.
“Maintain Audio Pitch” should be checked if you want your footage to sound as close to normal as Premiere Pro is capable of preserving automatically.
“Ripple Edit” is useful for preserving the rest of your edit if you have other clips loaded onto your timeline.
Once you’ve adjusted the settings to your liking, simply click “OK”, and Premiere Pro handles the rest. Your footage is now in slow motion.
UP NEXT
Types of Editing Transitions
You now know how to slow down a video in Premiere Pro. Having a working knowledge of every type of editing transition and understanding the purposes of each is valuable information for a video editor to possess. Learn all about the different types of editing transitions, when and why to use them, up next.
Up Next: Editing Transitions →
Share your vision with elegant shot lists and storyboards.
Create robust and customizable shot lists. Upload images to make storyboards and slideshows.
