C
reating call sheets is time-consuming, complicated, and necessary. But what if you had an easy-to-use call sheet template that you could apply to all your projects? What StudioBinder offers is a simple and clear way to create, send, and track these vital documents. In this post, I’m going to show you how to make a call sheet in a fraction of the time.
How to Make a Call Sheet in StudioBinder
Call Sheet Definition
What is a call sheet?
A call sheet is the who what where and when for a single day of a film or TV production. A good sheet will lay out all the work for the day, and most importantly help your cast and crew complete that work. Organization and clarity are key.
These are things many come to know when they first learn how to make a call sheet, but with StudioBinder’s software, the sheet will come organized and clear right out of the gate. Let's go over the whole process step by step.
MAKING A CALL SHEET
How to make a call sheet
The basic formula is consistent enough across many templates. But there is a catch. Every single shoot has different specific qualities.
How do you confront the countless shifting requirements with one template? StudioBinder will take you through the easy process of how to make a call sheet, step by step.
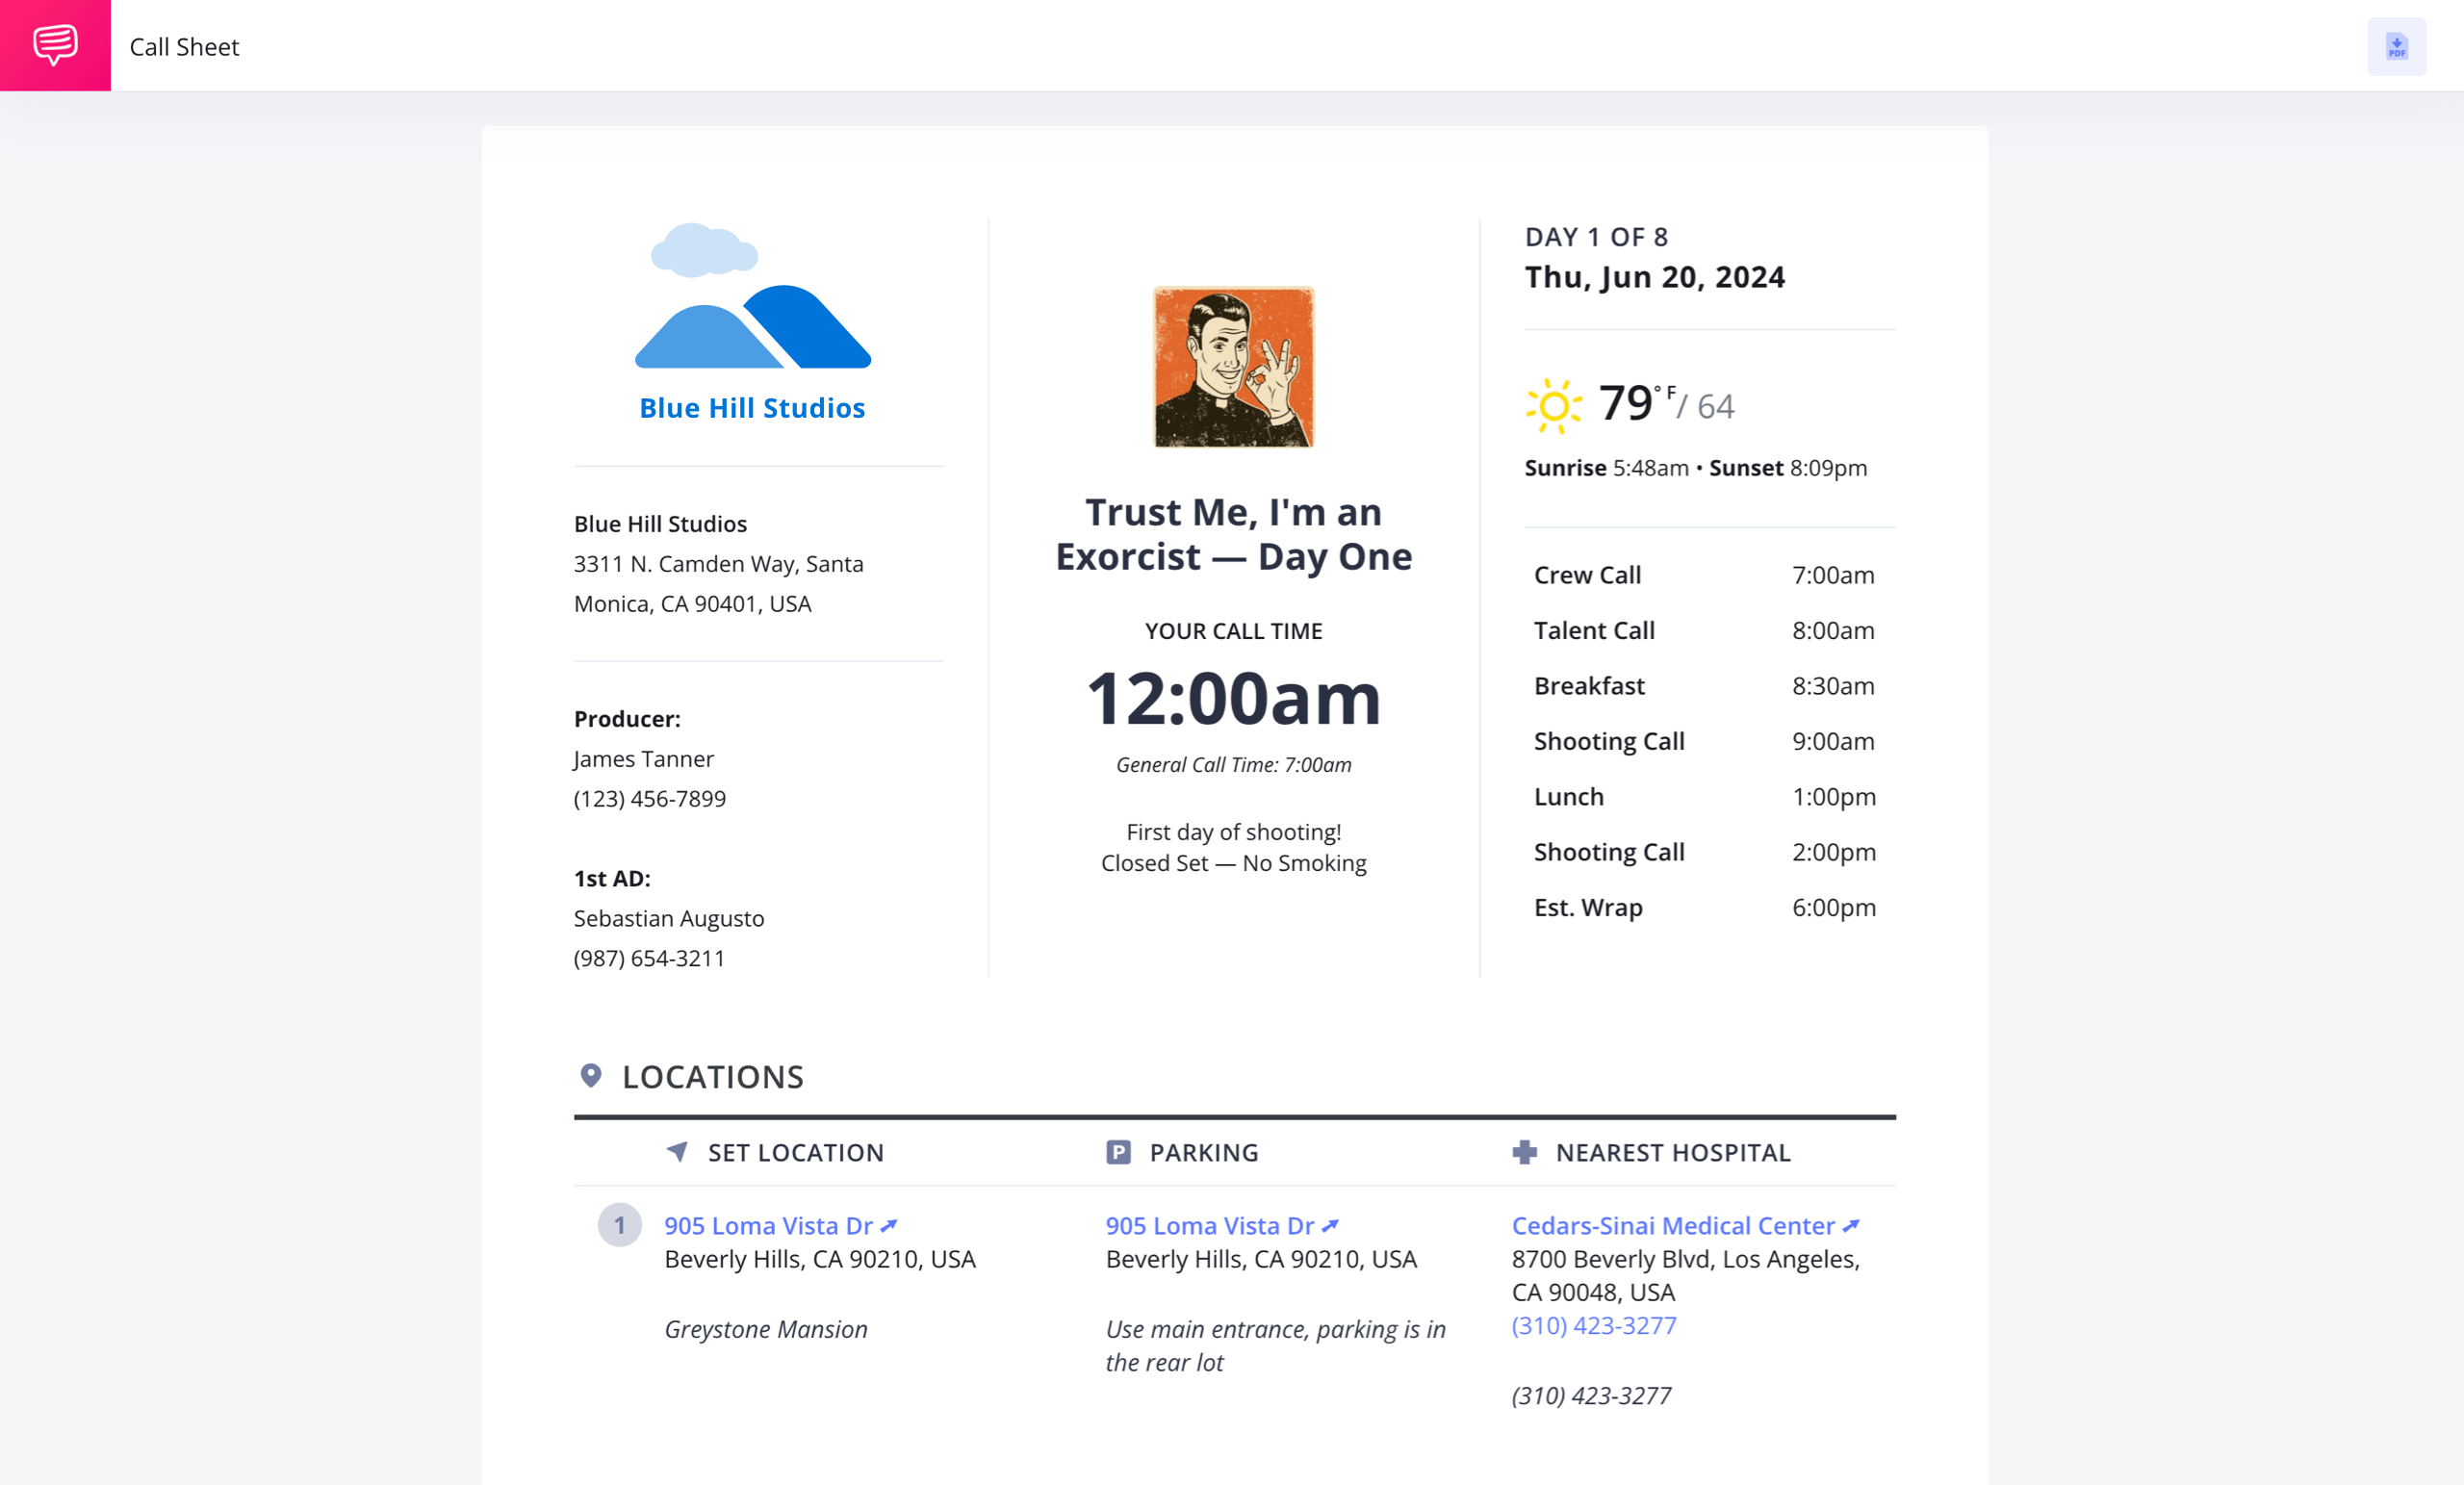
Take a look at StudioBinder's free call sheet builder below.
Created in StudioBinder's Call Sheet Builder
First things first — creating the sheet and adding contacts.
When you open your StudioBinder project you will select to create a call sheet. The first thing StudioBinder will ask is that you enter the project title, date, and the call time. Presenting these three pieces of information is the clear first step in learning how to make a call sheet.
How to add contacts • Subscribe to StudioBinder Academy
When you create a contact in StudioBinder, you enter all their contact information. A drop down menu will allow you to select if they are part of the cast or crew. Another drop down menu will allow you to assign the contact a position, or character name.
This up front organization will make creating the rest of this document much smoother. Future sheets for the same project can instantly add all the same contacts, which will save you a ton of time.
Another excellent feature available here is that you can add a private note for each recipient.
Say you want to remind the caterer to bring vegan option to set. That no longer needs to be in a separate email, or even worse sent out to everyone else as well. Make it a private note just to the pertinent crew member.
Make the Call Sheet Your Own
Customizing your call sheet
StudioBinder does all the layout work for you. All of the sections you’d expect to see on a professional sheet are here – all you need to do is decide how you want your particular layout to look.
Some people want a densely detailed sheet, while other prefer concise versions that include only the essentials. It's up to you.
How to customize your layout
Say, for example, you left some contact info on there for the EP by accident.
Innocent mistake. But if it goes unnoticed you may soon be on the receiving end of a “You’ll never work in this town again!” speech.
Here you can edit which primary crew members appear in the upper left box. It's always a good idea to have someone from the AD department listed here, along with their phone number.
It also allows you to update the production company logo in the upper left as well as on the upper center of the sheet.
Save It For Next Time
Creating a call sheet template
Once you've got the basic layout customized, now is good time to make yourself a template. Then, for all proceeding days and any project going forward, you've got a head start.
How to make a template
With a template saved, all that's left is to populate the information for that particular project.
STUDIOBINDER CALL SHEET SOFTWARE
Adding recipients
Next you'll have a chance to decide who needs to receive this call sheet. You can either choose from the project's pre-existing contacts, or enter brand new ones. Creating contact lists in StudioBinder comes in handy here as well.
How to add recipients
With your sheet set up and ready to send to all the right people, the next step is the fun part.
Related Posts
Filling In the Blanks
Populating the call sheet
This is the most important and involved step in the process. This is where you can add the specific details to that day's shoot.
How to populate a call sheet
From there you can add more important times for your day. You can distinguish between crew call time and talent call time, so why not add them both right up top.
It's also nice to let everyone know when the production will break for lunch. With just one click easily adjust the call times for talent and crew. This and other options, are all available to you when you customize the top right section, and can answer some of the most common on-set questions.
You will also likely want to customize the call time for the actors in your cast.
After the when comes the where. StudioBinder places the location box near the top of the sheet. Once you start typing your location's name or address, the Google integration will auto suggest physical addresses to will become map links for your recipients. Most sheets will include a picture of a map of the location.
In some instances you might use this feature to attach sides for the day's shoot, or a crew parking map when filming on location. You might attach a menu if lunch is being ordered.
PRO TIP:
Be sure that the hospital you enter is a 24-hour emergency facility. Not every hospital will have that type of facility. A little bit of advanced research can prevent a crisis.
Secondly, weather, sunrise, and sunset, are staples of any sheet and will show up as soon as you've entered a valid location. All of this information arrives quickly in this simple call sheet template.
Next to this will be parking and nearest hospital. No good sheet can omit either of these things. Clear and concise parking locations are CRITICAL to a smooth shoot.
Maybe it's day one and you need waivers or documentation signed. Attach them here. There is no better way to convey information.
The more specific your sheet can be about the day’s work, the more effective it can be in helping your production make your day. Your ability to pack in the details, while keep things clear and professional looking is an invaluable service to your production.
Related Posts
Sending Them Out
Distributing the call sheet
Once you’re ready to send out the sheet, you can send it out to everyone by clicking the Send button.
Alternatively, if you want to send them to specific recipients, you can do so via the View Recipients page.
Just find your list of recipients, and click the Send button.
How to preview and send
The finished sheet is also optimized for a mobile view for someone who opens it on their smartphone. They can also go out via SMS, which will show the call time and date, with a link to the mobile view of the rest.
When your cast and crew receive the mobile version, they will be able to call, text, or email contacts directly from it. This eliminates potential confusion and opens the direct line of communication.
Related Posts
Confirmation & Peace of Mind
Confirming receipt
So you’ve sent out the call sheet. You’re not done yet! You need to confirm everyone received it! In the old days, you’d have to take out your trusty phone and call/SMS your recipients.
StudioBinder tracks the views and confirmations via a built-in RSVP feature. You'll know who has received the email, who has opened it, and most important, who has confirmed.
No more concern about who got the information for tomorrow's shoot.
How to track confirmations
Don’t worry — your cast or crew don’t need an account to view or confirm these sheets, so it’s painless and saves your production a bunch of uncertainty.
You may find you need to edit an email for someone, say there was a typo and the sheet bounces back. You'll see that in your View Recipients page. Just adjust the email and resend.
UP NEXT
Make your own call sheet
We’ve been hinting at the StudioBinder Call Sheet Builder; now it’s time to use it. If you have a shoot coming up, look no further. The app’s intuitive lay-out will let you hit the ground running and focus on what’s important.

